Angular Form: Reactive vs Template
Hello World!!!
In this post, I'd like to introduce you two approaches to building an Angular Form: The Reactive-driven form and Template-driven form provided by the Angular framework.
Introduction
Both use a common idea to control the HTML form elements. This happens with FormControl, FormGroup and FormArray [1]. However, the Template does this more implicitly while Reactive is more explicit. Moreover, the first one uses directives (ngModel, ngModelGroup, ngForm) and the second one uses classes such as FormControl, FormGroup and FormBuilder. The Reactive form allows more control over the data model, tests and validations.
- FormControl: It's responsible to encapsulate the information regarding an input element (e.g changed value or set a new value). It's created for each form field. The list of the methods you can use to manipulate the elements you can see here.
- FormGroup: It's a collection of FormControls. This is identified by the pair key/value. You can have FormGroup inside the FormGroup (nested)
- FormArray: is an array of FormControls. It doesn't use the pair key/value.
To use this control, the first thing first is to import the FormsModule if you use Template and ReactiveFormsModule if you use Reactive form. After that, you should add in the imports metadata.
import {FormsModule, ReactiveFormsModule} from "@angular/forms";
...
imports: [
  ...
  FormsModule,
  ReactiveFormsModule,
  ...
  ],
  ...
Template-Diven Forms
In this approach, many steps are behind the scenes. A top-level FormGroup instance is created implicitly by the form directive. If you need to manipulate the ngForm instance, you can export that into a local variable. In the example below, the '#myForm' has a reference to the ngForm and can be used in any part of the form.
<form #myForm="ngForm" (ngSubmit)="onSubmit(myForm)">
  <p>
    <label for="completeName">Complete Name</label>
    <input type="text" id="completeName" name="completeName" ngModel>
  </p>
  <p>
    <label for="email">Email </label>
    <input type="text" id="email" name="email" ngModel>
  </p>
  <p> <button type="submit">Submit</button> </p>
</form>
Besides this, a FormControl instance is created implicitly in each element that uses ngModel directive. It makes possible to control these elements.
That control of the elements can be done by the simple use of the ngModel directive, such in the example before, or you can use the two-way data binding. Everything used in this way should be declared in your class to maintain data consistency. Then, it keeps the component model in sync with the FormModel. The example below uses the 'completename' attribute in the class to be updated.
<p>
  <label for="completeName">Complete Name </label>
  <input type="text" id="completename" name="completename"
  [(ngModel)]="completename">
</p>
To manipulate this form in your component class you can create a reference using ViewChild or by method parameter such used by onSubmit method:
import {NgForm} from "@angular/forms";
...
@ViewChild('myForm',null) myForm: NgForm;
...
setEmail() {
  this.myForm.controls.email.setValue("my@email.com");
};
public onSubmit(myForm: ngForm){
  myForm.controls.email.setValue("newmy@email.com");
}
If some form element needs to be validate, you need only add the validator in the template. The template-driven use directives to this.
<input id="email" name="email" type="email" #email="ngModel"
     [(ngModel)]="email" class="form-control" required email/>
<label for="email">
  <p [class]="email.valid ? 'green-class' : 'danger-class'"></p>
</label>
In case you have to add some conditional you can do this by directives:
<input id="email" name="email" type="email" #email="ngModel"
  [(ngModel)]="email" class="form-control"
  [required]="isConditionRequiredOK()"
  [email]="isConditionEmailOK()"/>
Reactive Forms
Here, the developer is responsible to build the model. The FormGroup needs to be create explicitly.
You need to import FormGroup and FormControl. If you use Validators then you should import Validators as well. The validators can be synchronous or asynchronous. Also, you can custom a validator.
# Component Class
import { FormGroup, FormControl, Validators } from '@angular/forms'
...
myForm = new FormGroup({
  completename: new FormControl(),
  email: new FormControl('', [Validators.required, Validators.email])
  })
In the page example, the formGroup directive is used to bind the form. The formControlName is the key in the FormControl. It bind the input field to a individual form control. The name used to the formControlName value should be the same name declared in the class.
# HTML Template
<form [formGroup]="myForm" (ngSubmit)="onSubmit()">
  <p>
    <label for="completeName">Complete Name</label>
    <input type="text" id="completeName" name="completeName"
       formControlName="completename">
  </p>
  <p>
    <label for="email">Email </label>
    <input type="text" id="email" name="email" formControlName="email">
  </p> <p> <button type="submit">Submit</button> </p> </form>
To access the control by the class you can do:
# Simple way
myForm.get("email").valid
# Nested
myForm.get("superGroup.subGroup").valid
Dif: Reactive vs Template
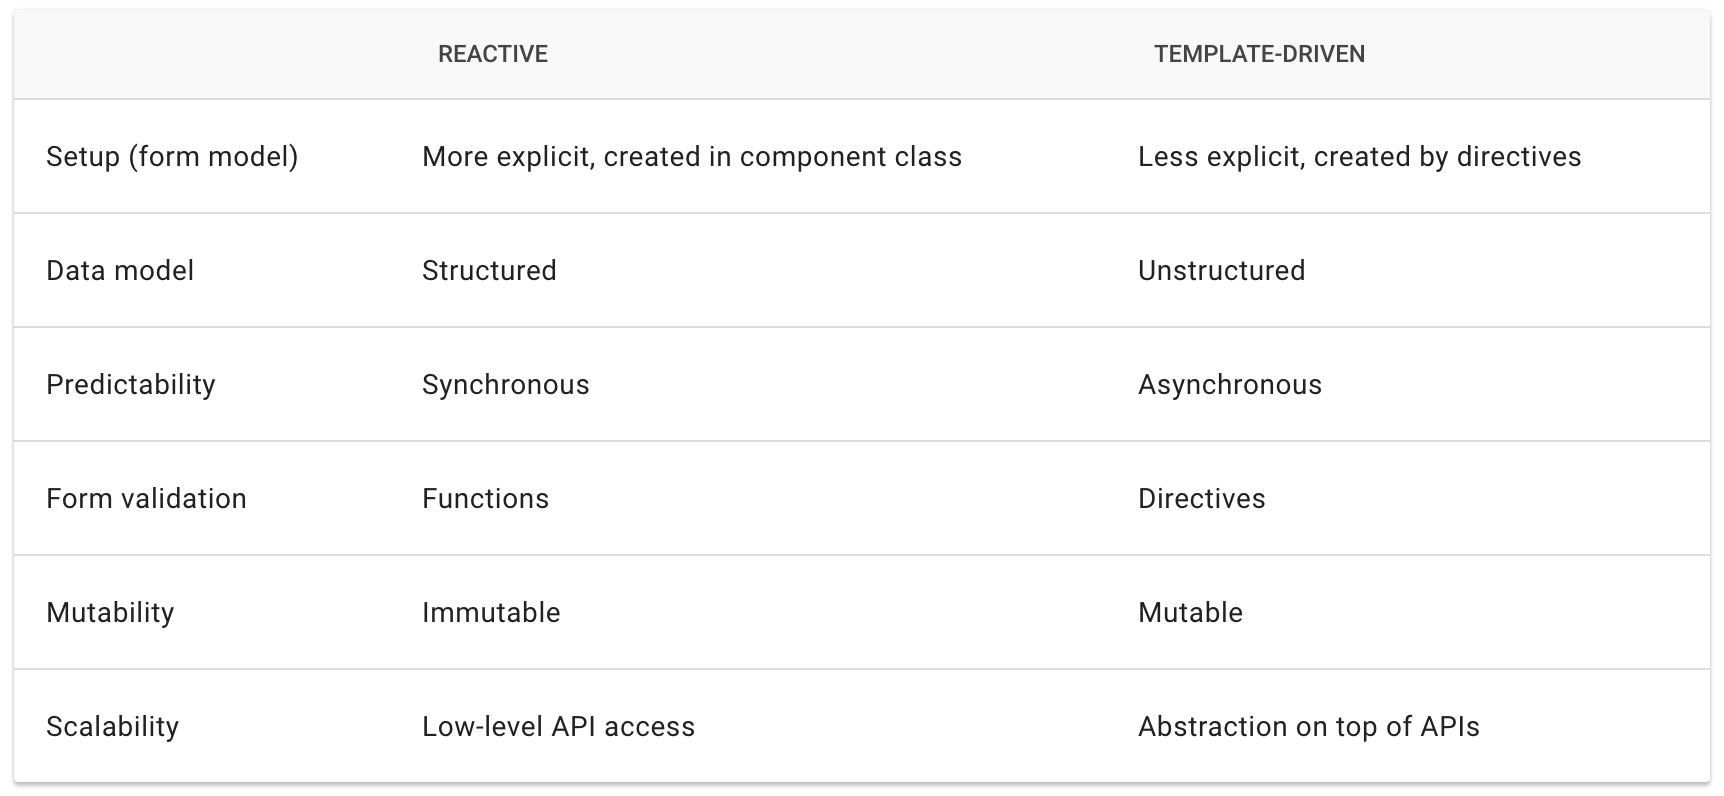 Key Differences
Using Template-driven forms you will have less code then using Reactive forms. Then, it can be easier and practical. By other hand, if you need more control to manipulate the controls, the Reactive will be easier. Also, Reactive Forms are more prepared to work with unit tests.
REFERENCES
- Angular Guide - Forms Overview
- Angular Guide - Template-Driven Forms
- jacacodegeeks - Angular6 reactive form example
- tektutorialshub - Form Control in Angular
- tektutorialshub - Angular Template-driven forms
- tektutorialshub - angular-reactive-forms-validation
- tektutorialshub - angular-reactive-forms
- tektutorialshub - Angular Forms Tutorial: Fundamentals & Concepts
- angularfirebase - Angular Reactive Forms Basics Guide
- jasonwatmore - Example template-driven Angular6
- jasonwatmore - Example template-driven Angular7
- jasonwatmore - Angular6 - Reactive Forms Validation Example