Kubernetes
What is it? > Architecture > Pod > ReplicaSet > Special Attributes > Deployment > Deployment Strategy > Service > Ingress > Network Policy > Network > Volume > Namespace > Secrets > Service Account > Affinity, Taints and Tolerations > Security > CronJob > Hands-On
Introduction
What is it?
The tradicional deployment didn't scale the resource and it impact in the cost. Another alternative of deployment is the virtualiation, that isolate the apps. It is a better utilization of resources and scalability but each VM represents a enteire machine. Using containers as the third alternative is possible to have the isolation of the application and share the other resources secondary to the application. Also, the cycle of deployment is easear to handle. This last solution is considered lightweight.
The kubernetes or K8s comes as solution for container orchestration that provides a framework to run distributed systems resiliently, takes care of scaling and failover for your application and provides deployment patterns. It is a container orchestration technology. It orchestrates the deplyment and management of containers. The containers can be managed by Docker. Some of features available are: Service discovery and load balancing, Storage orchestration, Automated rollouts and rollbacks, Secret and configuration management, Horizontal scaling, IPv4/IPv6 dual-stack, etc.
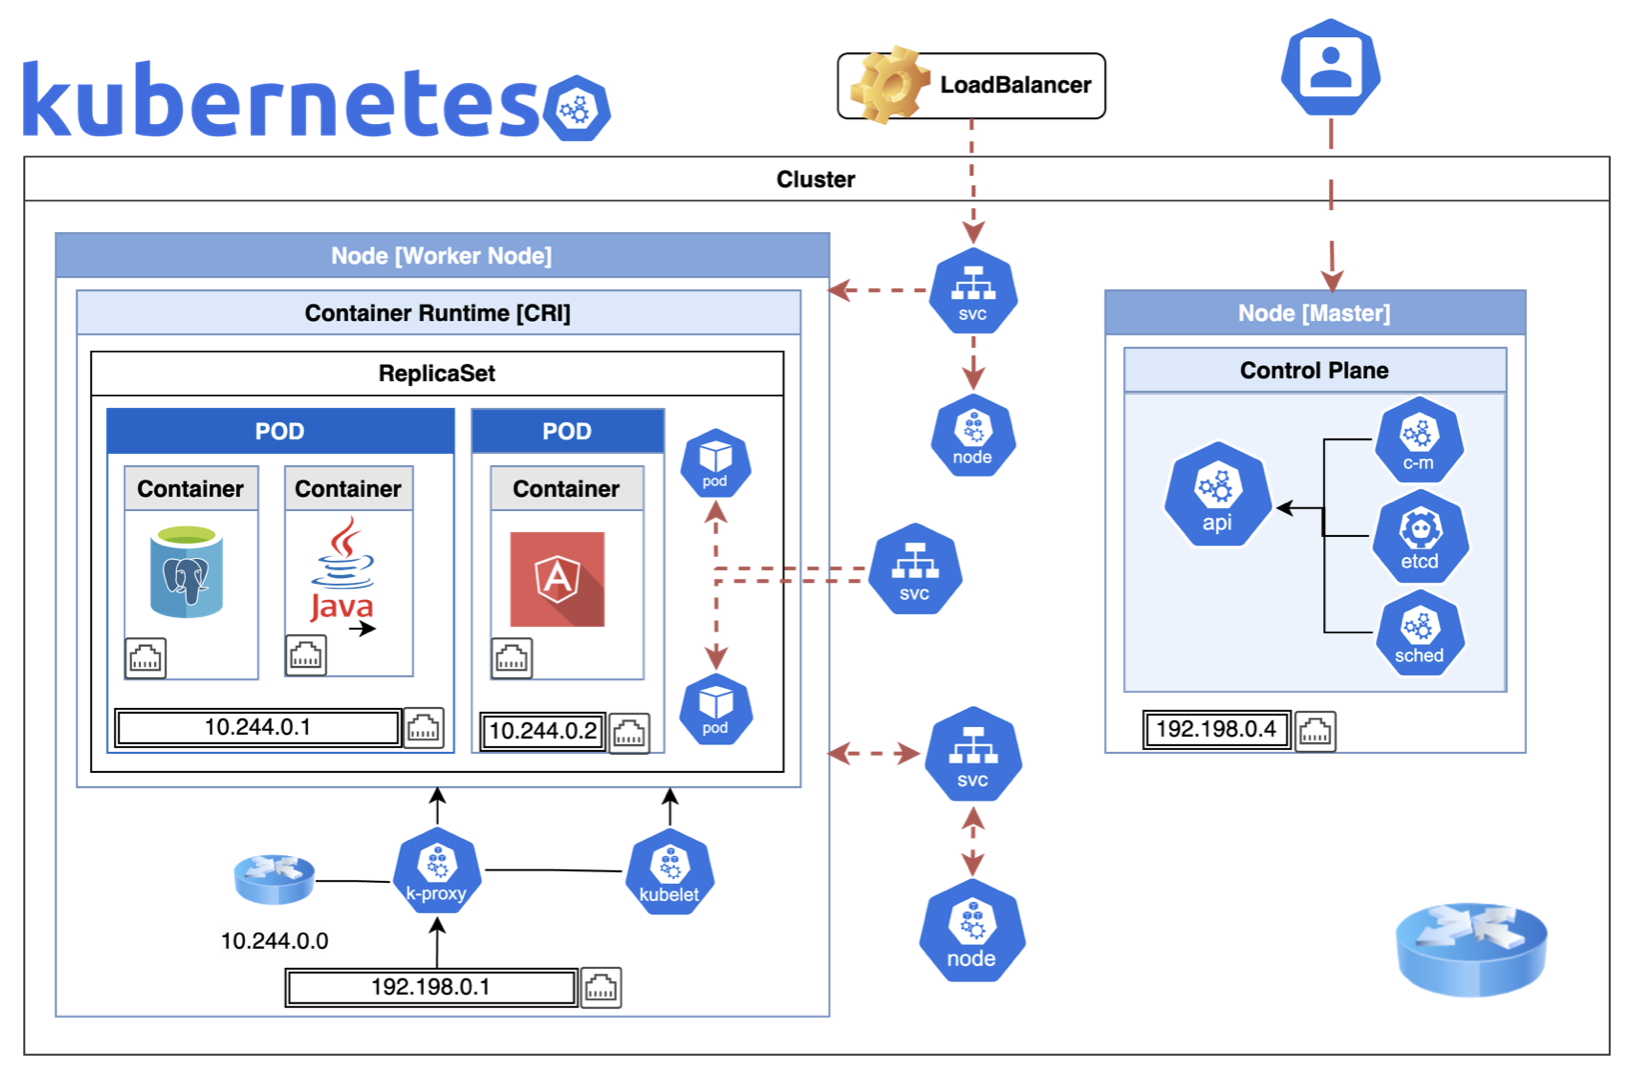
Architecture
Node is a machine where K8s is intalled. It includes kubelet, container runtime and kube-proxy. They are managed by the control plane.
Cluster is a group of Nodes managed to keep the application available even if one node fails. That management is done by a node called Master. This node is configured to have the information about the other nodes and manage them. It is responsible for the orchestration of the containers.
Components in Node Master, the orchestrator [Control Plane Componenets]:
- kube-apiserver: it is between K8s and external Node communication. It communicates with Worker Node by kubelet.
- etcd: is respnsible to store all data used to manage the cluster to be used by K8s. For instance, it implements locks to avoid conflicts between masters.
- Scheduler: responsible for distributing work or containers across multiple nodes.
- Controller [kube-controller-manager][cloud-controller-manager]: the brain behind the orchastration - noticing and responding when nodes, containers or endpoints goes down. It makes decisions to bring up new containers
Components in worker nodes [Node Components]<:/p>
- Container Runtime: software used to run container (e.g Docker).
- kublet: agent that runs on each node in the cluster. It is responsible that the containers are running on the nodes as expected
- kube-proxy: is a network proxy that runs on each node of the cluster, and maintains network rules on nodes. It allows the network communication to the Pods in the cluster
Basic Concepts
A note before we start this journey: be aware kubernetes allow two ways to manage the objects. The first one is declarative that use file definitions; and imperative, that use command line directy.
Pod
Pod is a kubernate object that represents a deployable unit of a set of containers. The containers are encapsulated into the Pod that run an instance of the application. If you need to increase the application with more Pods then you need increase the replication number (scale up). To have an application in a Pod is assumed that the application is already developed and built into an images and it is available in some repository. Also assume that the Kubernetes cluster has set up and working. The Pod can have more than one container (only one instance), but the best practices is to have only one container by Pod.
// Declarative
$ kubectl create -f pod-definition.yaml // Declarative
// Extract the pod definition
$ kubectl get pod webapp -o yaml > pod-definition.yaml // edit
// Create a file from imperative before create
$ k run mypod --image=nginx:alpine --dry-run=client -o yaml > mypod-definition.yaml

// Imperative
$ kubectl run nginx --image=nginx.
$ kubectl run custom-nginx --image=nginx --port=8080
$ kubectl run redis --image=redis:alpine --labels="tier=db"
$ kubectl run hello-minikube
$ kubectl cluster-info
$ kubectl get nodes
$ kubectl get pods

// Copy the logs
$ k logs mypod > /opt/mypod.logs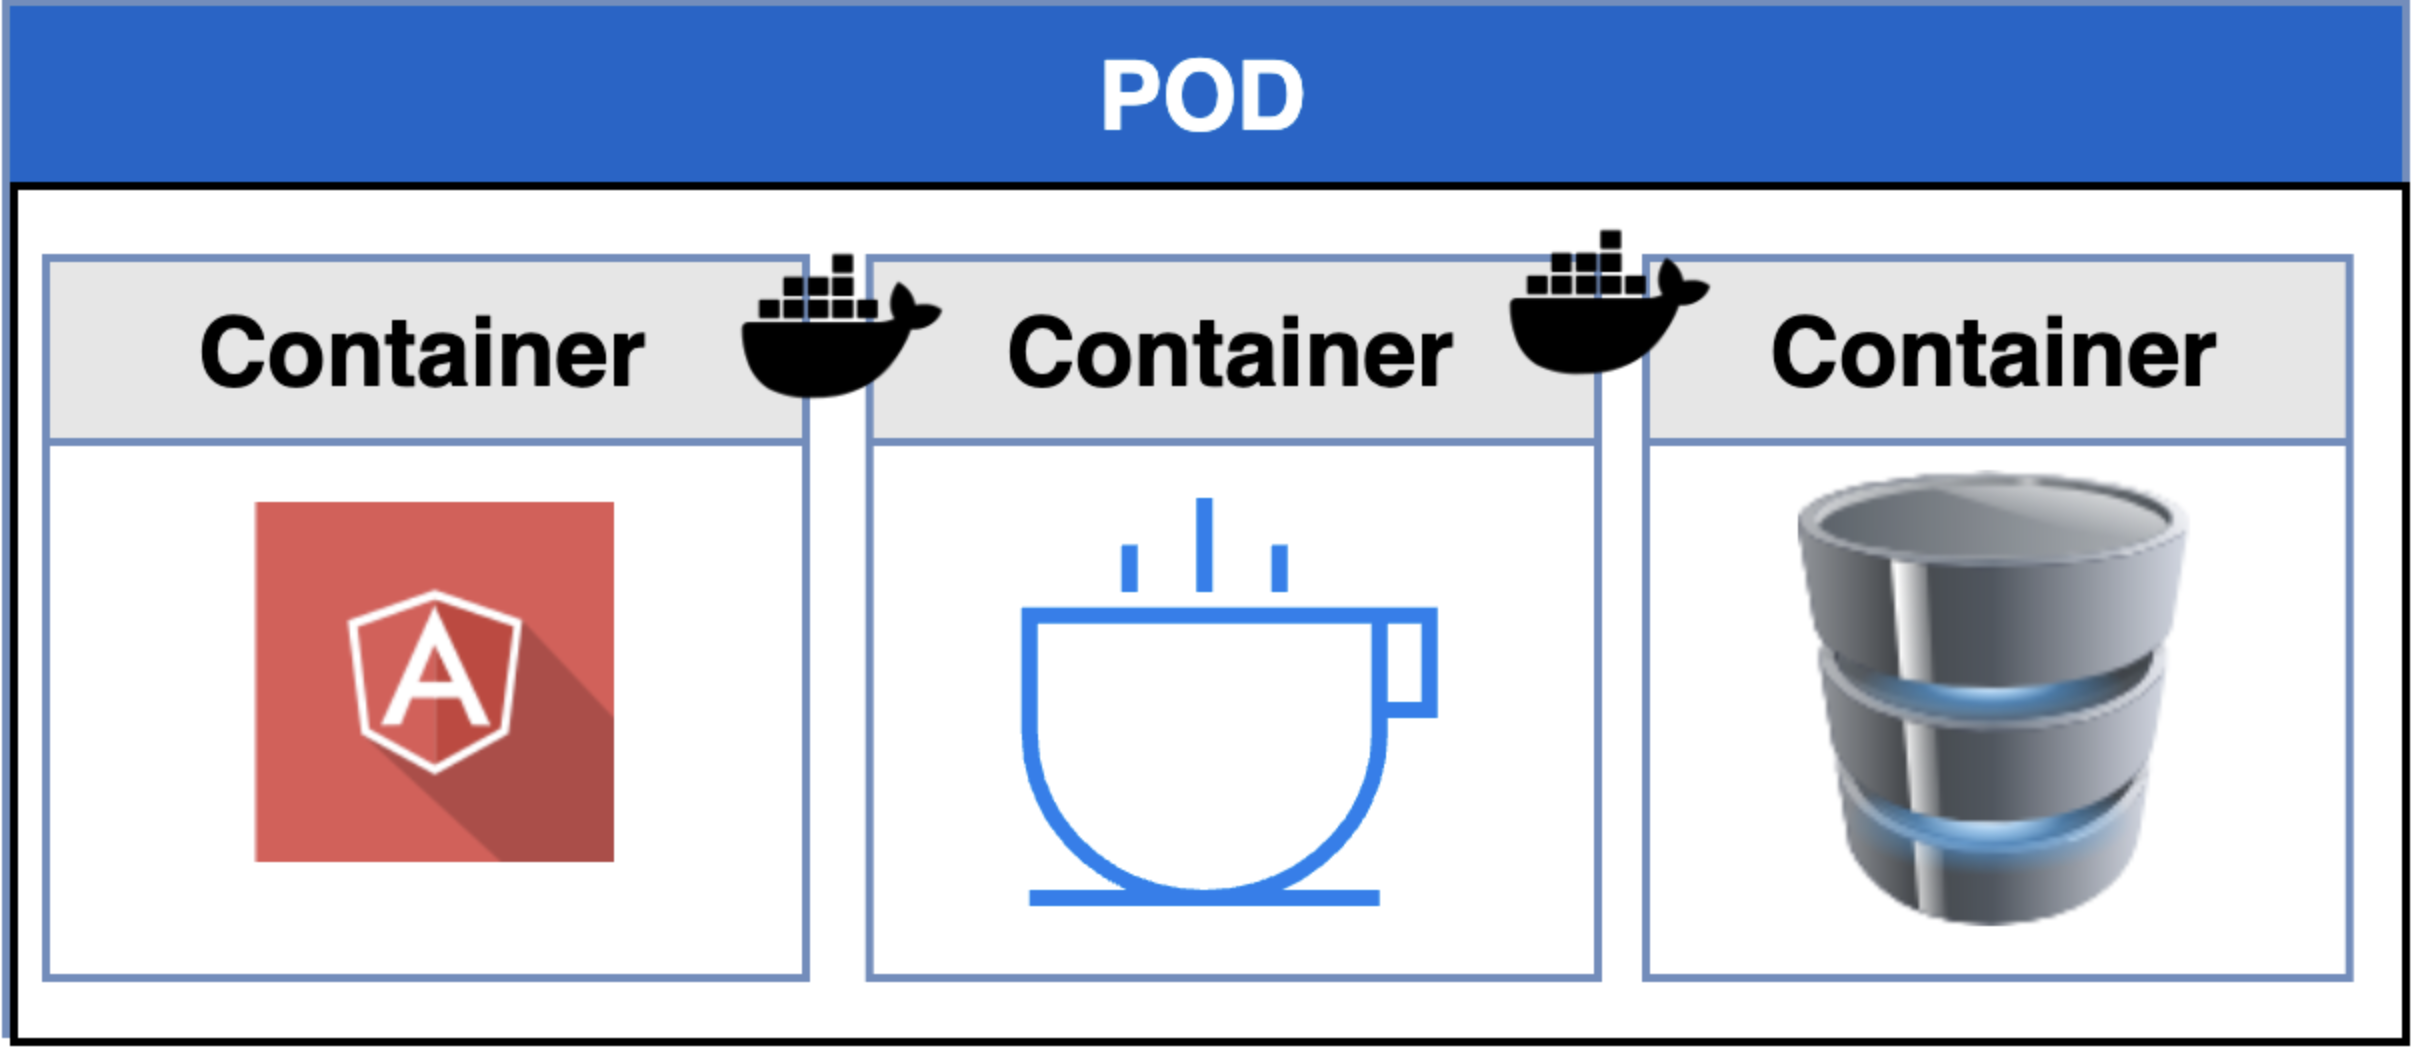
A special feature to Pods is the Pod Initialization. It uses an Init Container to initialize a Pod before an application Container runs.
Any trouble with your pod you can Debug Pod and Debug Running Pod.
ReplicaSet
ReplicaSet maintain a stable set of replicas running at any given time. it is used to guarantee the availability of a specified number of identical Pods. Then, it ensures high availability and handle loads across the pods (load balancing). Even the Pods already created, it's possible to scale that number.
$ kubectl get replicaset
$ kubectl replace -f replicaset-definition.yaml
$ kubectl edit rs new-replica-set
$ kubectl scale -replicas=6 -f replicaset-definition.yaml
$ kubectl scale rs new-replica-set --replicas=6 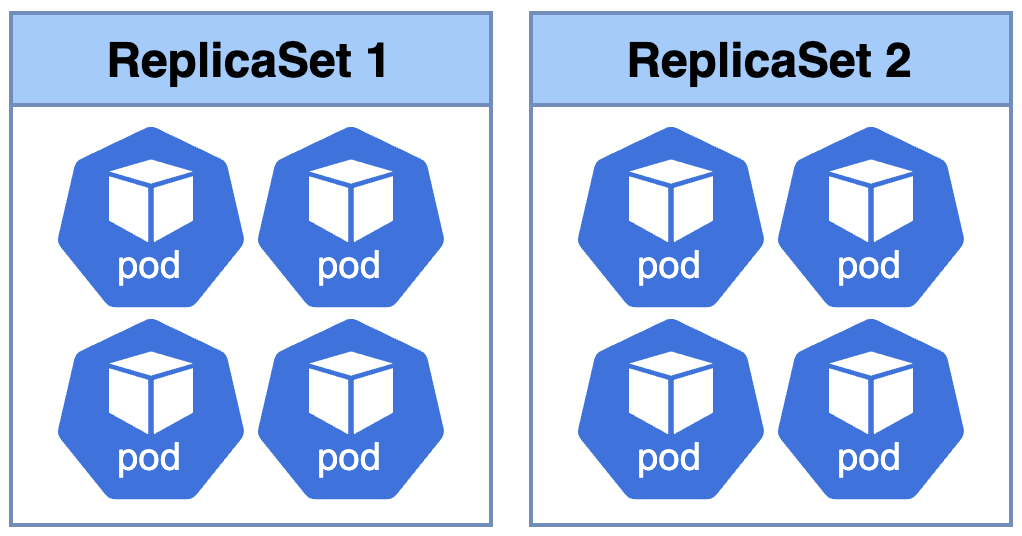
Special Attributes
- Labels and selectors: the objects in kubernates have labels to be used to monitor that objects. For selector, the 'matchLabels' are used to filter the objects. The idea of selectors is to have flexibility when it comes to expressing which other resource be connected to or controlled by other resource.
- Environment Variables: It's possible to use env attributes to add the variables to be used. It can be a direct key-value pair or doing a reference to a external file.
- ConfigMap: it is a key-value pair configuration used as more organized way to create the configuration using separated files.
$ k create cm myconfigmap --from-literal=DB_NAME=SQLDB --from-literal=DB_HOST=localhost
Deployment
Deployment build the desired state. A Deployment provides declarative updates for Pods and ReplicaSets. It allow edit any field/property of the POD template. After the change, the deployment will automatically delete and create a new pod with the new changes. The deployment can be rollback when the deployment is not stable. Also, you can scale the deployment if you need increase or decrease the replicas. If you delete the deployment object, the others object created by it will be deleted (e.g., pods and replicase).
// CREATE
// Declarative
$ kubectl create -f deployment-definition.yaml
$ k create deploy mydeploy --image-nginx --dry-run=client -oyaml > deploy-def.yaml

// Imperative
$ kubectl create deployment nginx --image=nginx
$ kubectl create deployment nginx --image=nginx --replicas=4

$ kubectl scale deployment/nginx --replicas=2 // update the replicas
$ kubetcl get deployments
$ kubectl get all

// UPGRADE - StrategyType attribute (First step is created a new replicaSet)
$ kubectl edit deployment my-deployment                // Change definition directly
$ kubectl apply –f deployment-definition.yml           // Create or update
$ kubectl replace –f deployment-definition.yml --force // delete and replace the pods
$ kubectl set image deployment/myapp-deployment nginx-container=nginx:1.9.1

// ROLLBACK (destroy the pods and go back with the olders)
$ kubectl rollout undo deployment/myapp-deployment
$ kubectl rollout status deployment/myapp-deployment
$ kubectl rollout history deployment/myapp-deployment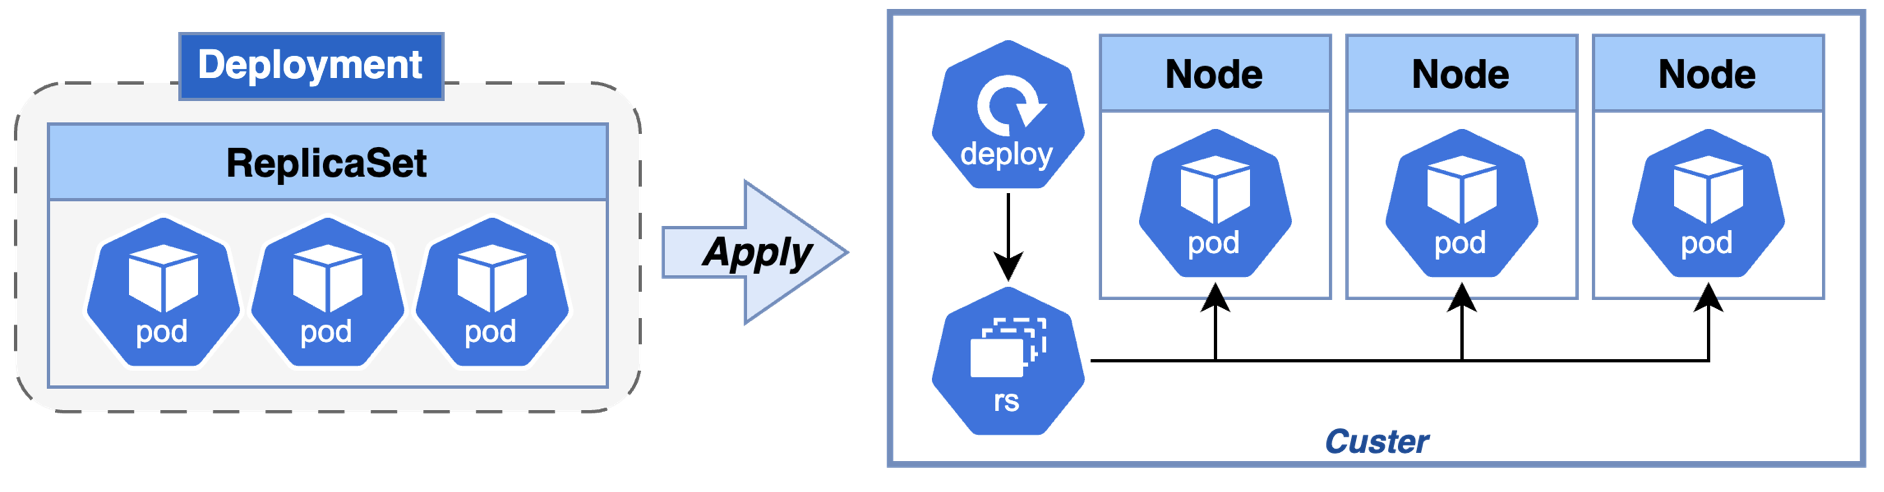
Deployment Strategy
The kubernetes allows to use different Strategy that define how the application should be updated. When you create a deployment, it triggers the deployment process. Also, it creates a new Deployment revision. A fancy diagrame comparing the strategies you can see here.
- Rolling deployment: replace the pods one by one
- Recreate: terminate all the pods and replace all the pods
- Canary: progressivelly delivery - change the traffic step by step
- Blue/Green: replicate the environment
Network
When the K8s is configured it creates an internal private network and attache all PODs. The Pods will have an IP when they are deployed.
Service
Service: Expose an application running in your cluster behind a single outward-facing endpoint. Pods have an internal IP but it cannot be used to access the Pod outside of the cluster. Beside, the IP changes always when a Pod is replaced. The service groups Pods with a shared IP which will not change, and that address can be exposed internally and externally of the custer, what allow the Pods be accessible outside of the cluster.
Types of services [1][2][3][4]
- ClusterIP: expose only inside the cluster (defaut). There are virtual IP to allow communication between them, e.g, frontend and backend inside the cluster.
- NodePort: Exposes the Service on each Node's IP at a static port (the NodePort). It makes the pod available outside of the node mapping the port on Node (NodePort - 30000 to 32767) to the port on the Pod (TargetPort).
- LoadBalancer: Exposes the Service externally using an external load balancer
$ kubectl create service nodeport jekyll-node-service --tcp=8080:4000 --node-port=30097 -n development
$ kubectl expose pod redis --port=6379 --name redis-service       // example 1
$ kubectl run httpd --image=httpd:alpine --port=80 --expose=true  // example 2
$ kubectl get svc
$ kubectl cluster-info // get list of URLs of services running in the cluster
Any trouble with your service you can Debug Service.
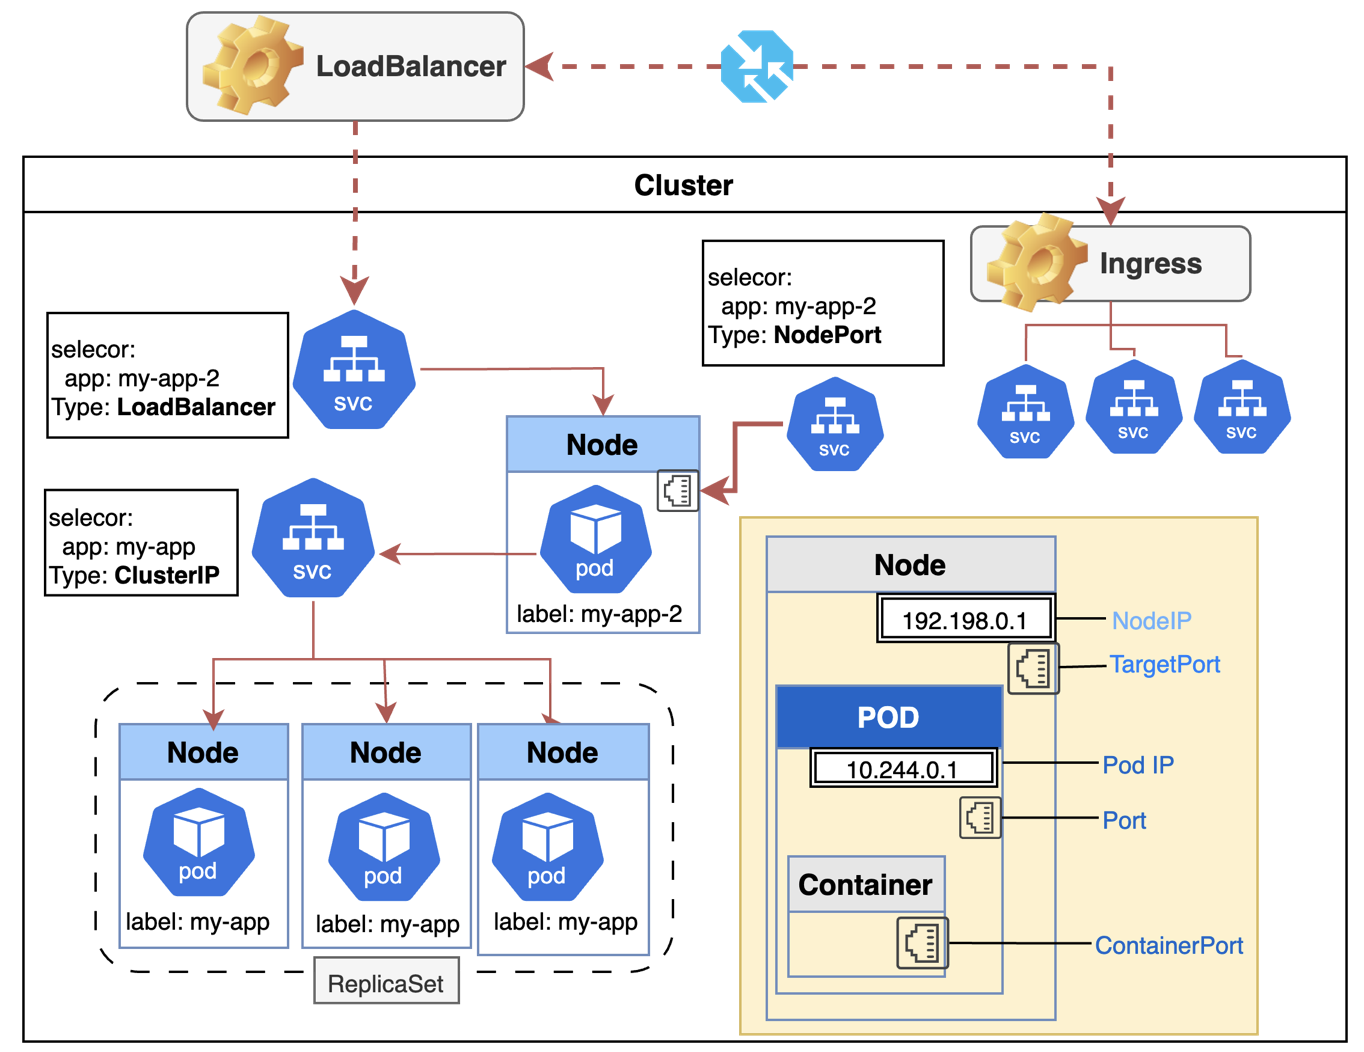
Ingress
The Ingress is an API object that manages external access to the services in a cluster. Traffic routing is controlled by rules defined on the Ingress resource. The difference between service and ingressis that service create a single point of access to a group of pods, and ingress expose multiple services using one IP through rules that define the graphic. A good example you can see here.
Network Policy
The Network Policy can be used to control the traffic.
Storage
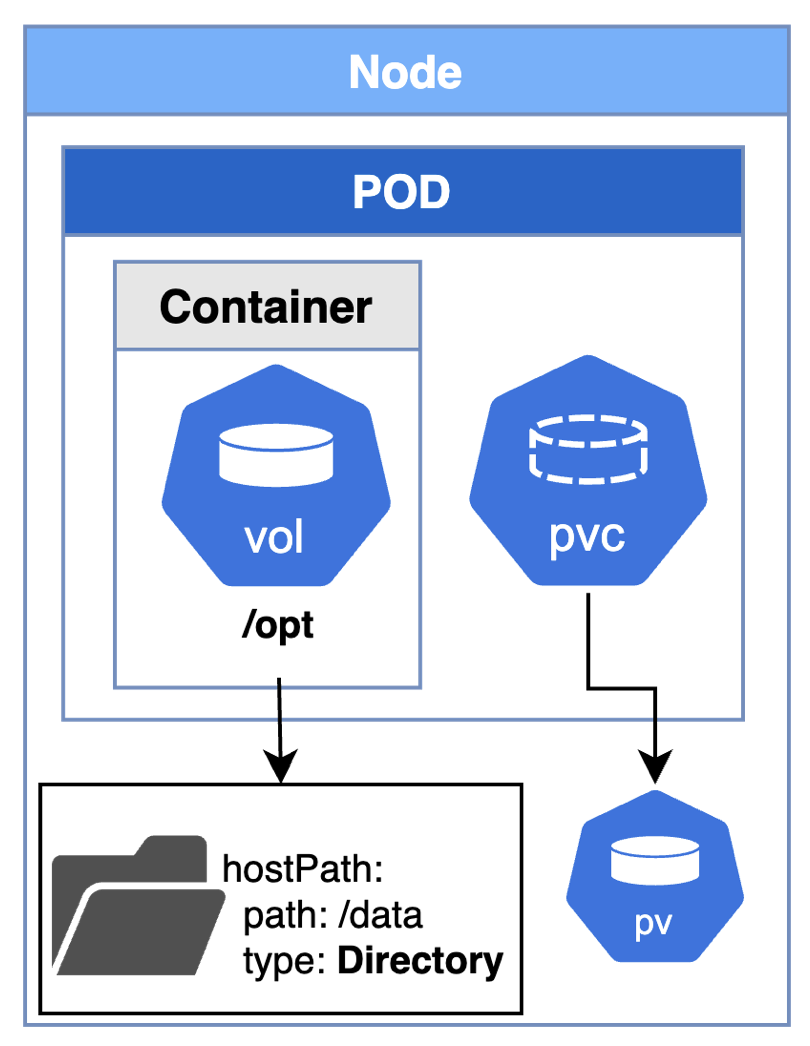
The volume is a directory which is accessible to the containers in a pod. The volume persists even if container restart. However, the volumes are removed when the Pods are destroyed. Considering One-Node environment, the hostPath property helps to keep the data visible for that Node.
Persistent Volume is a volume in the cluster with the lifecycle independent of the Pod. Persistent Volume Claim is a request for storage by user.
Namespace
Namespace: mechanism for isolating groups of resources (pods, rs, jobs, deployments, svc, secrets, roles, rolebinding, configmaps, PVC) within a single cluster. However, some resources (e.g Node, PV clusterroles, namespaces, clusterbindings) are cluster scope and cannot be grouped.
$ kubectl get namespaces
$ kubectl create -f namespace-dev.yaml
$ kubectl create namespace dev
$ kubetcl get pods --namespace=dev
$ kubetcl get pods --all-namespaces kubetcl get pods -A
$ kubectl delete deploy redis-deploy -n dev-ns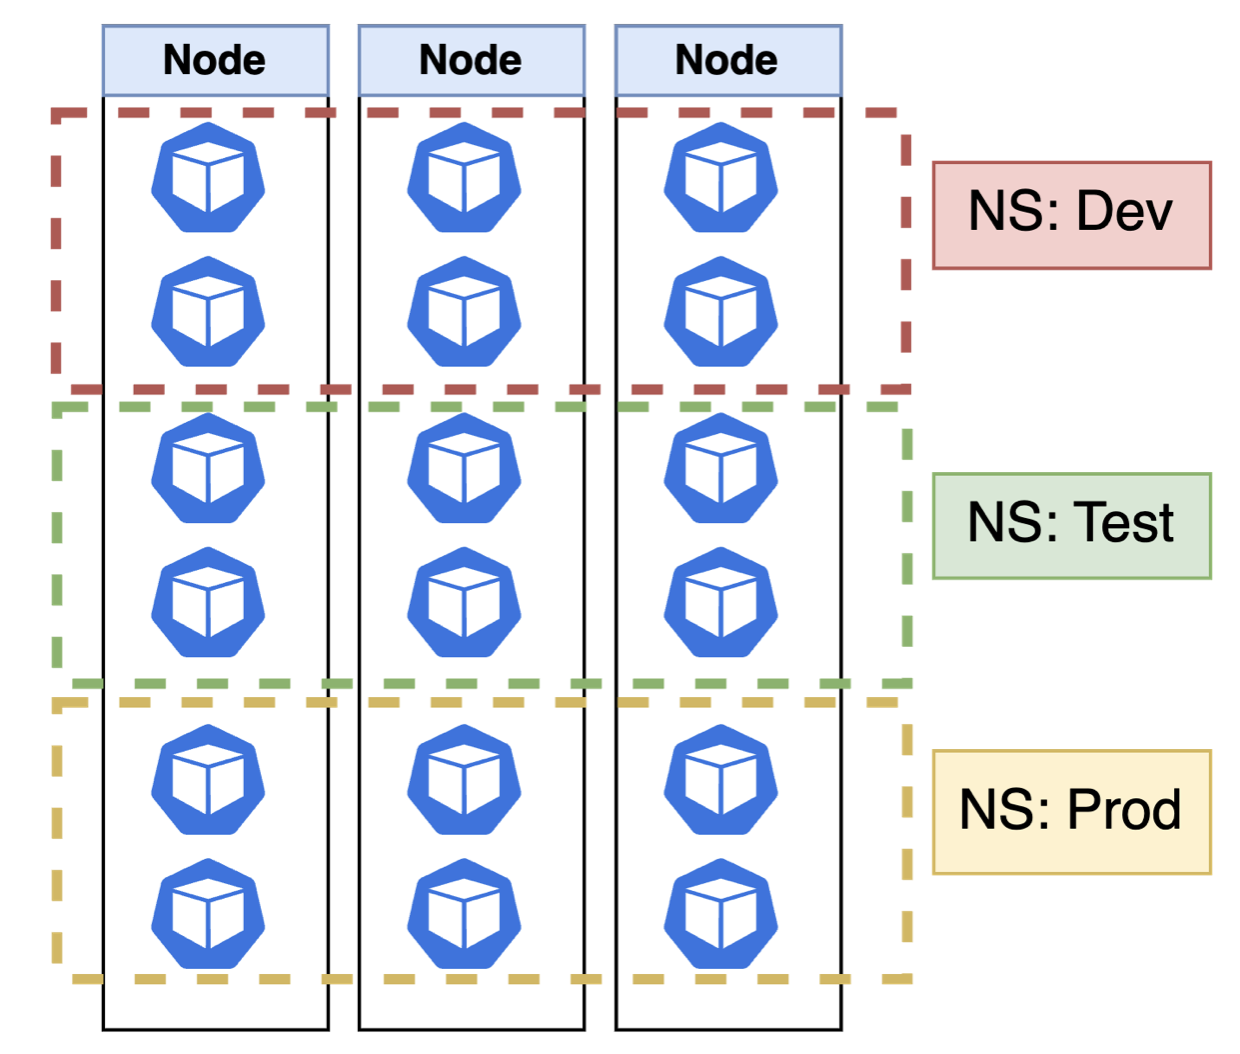
Secret
The Secrets objects are used to store sensitive data which is done in an encoded format. It is created independent of the Pod. You can see different ways of manage the secrets here.
$ echo –n ‘mysql’ | base64
$ echo –n ‘bXlzcWw=’ | base64 --decode

// Imperative
kubectl create secret generic app-secret \
  --from-literal=DB_User=root \
  --from-literal=DB_Password=paswrd

// Declarative
$ kubectl create -d secret.yaml

$ kubectl get secrets
$ kubectl describe secrets
Service Account
Service Account is an account to allow the communication machine-to-machine. When it is created, a token is generated inside a secret object. When you create a cluster, Kubernetes automatically creates a ServiceAccount object named default for every namespace in your cluster.
kubectl create serviceaccount my-sa
kubectl get serviceaccount
kubectl describe serviceaccount my-sa
kubectl describe secret my-sa-token-kbbdm
Affinity, Taints and Tolerations
Node affinity is applied to Node and allow to constrain which nodes a Pod can be scheduled on based on node labels.
Taints are applied to node and allow a node to repel a set of pods.
Tolerations are applied to pods. Tolerations allow the scheduler to schedule pods with matching taints.
Security
The Security is an important topic in K8s. The kube-apiserver is the first point of defense because it is the point of communication in the cluster. By default, all ports can access all other ports, allowing the communication between Pods inside the custer. It can be restricted by Network Policies.
- Authentication (Who can access): static pwd and token file (deprecated 1.19), certification, LDAP, service account
- Authorization (what they can do): Node, RBAC, ABAC, Node authorization, Webhook mode
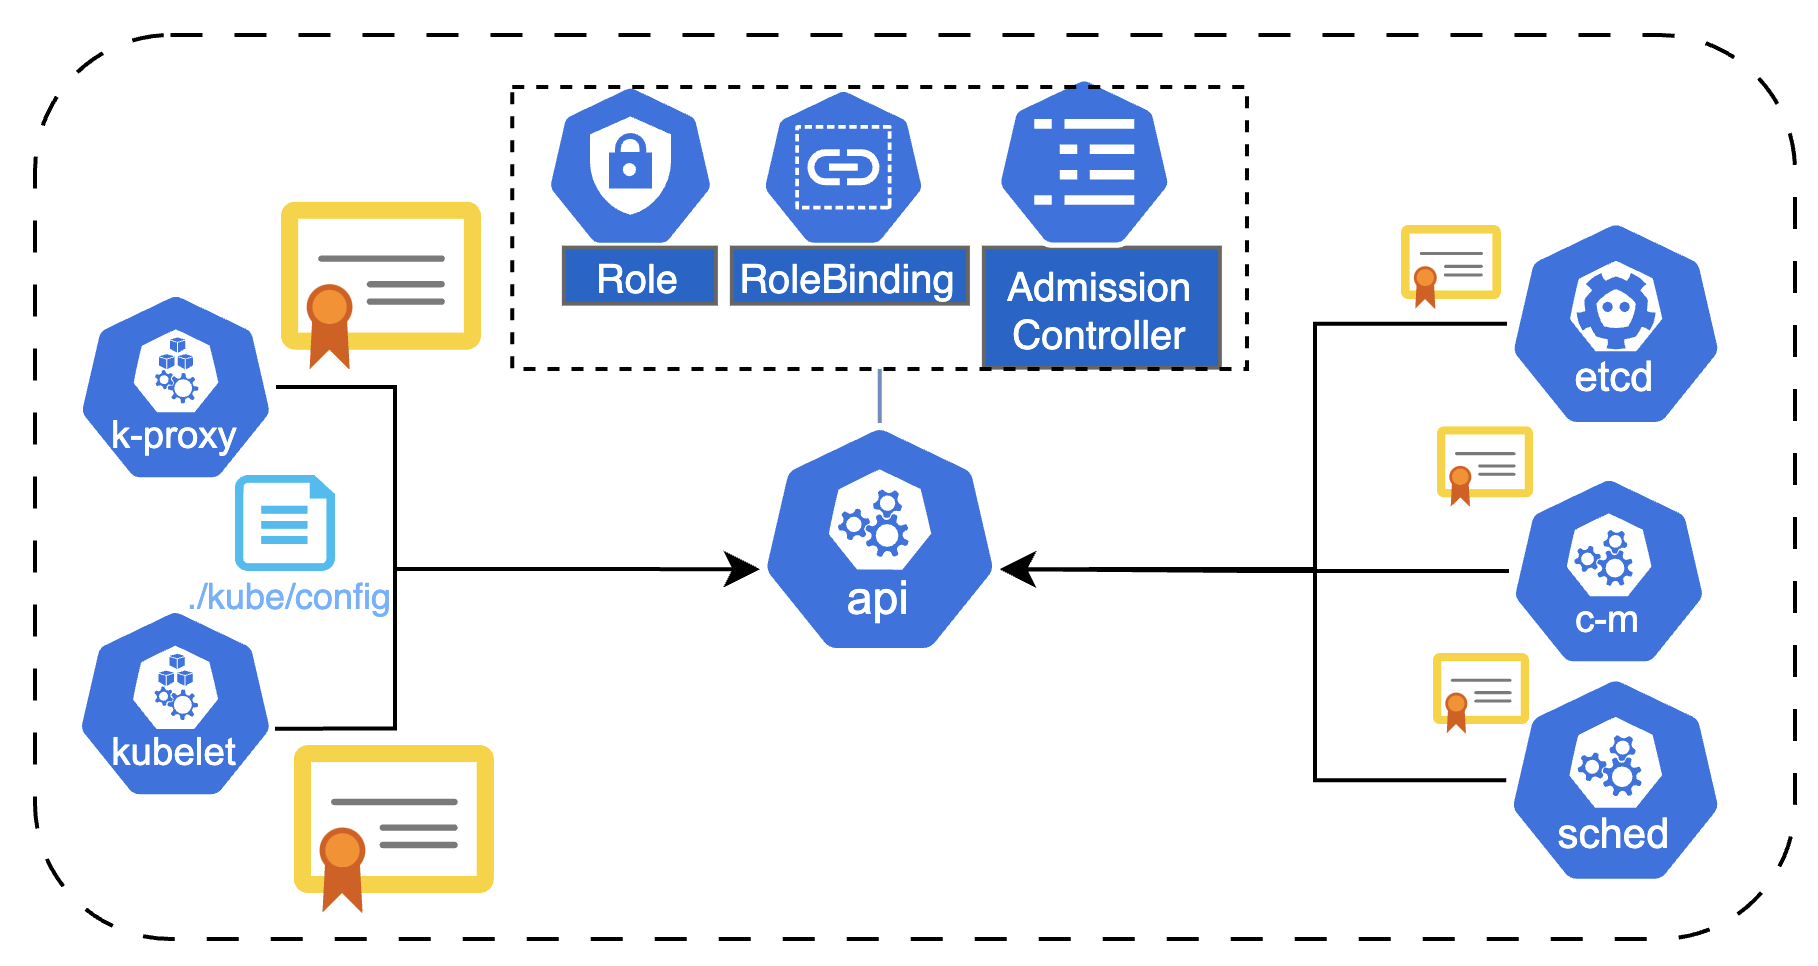
The service account is managed by K8s but the other users are managed by a third system like LDAP or Okta. The K8s uses the details or certificate to validate them.
This file has the credentials and there are three section: cluster (it has the server specification), users (it has keys and certification) and context (which user has access to which cluster). Pay attention that is using users that already exist.
// FILE - $HOME/.kube/config
$ kubectl config view

// COMMANDS
$ kubectl get pods --kubeconfig config
$ kubectl config view // it will omit the secrets
$ kubectl config use-context colimaThe K8s API has different groups to manipulate the resources. For instace in '/api' endpoint there is the core group where you will find the core funcionalities (pods, namespace, rs, pv, etc). The '/apis' you will find the named group where you will find extension, apps, networking.k8s.io, storage.k8s.io, etc.
It will happen after the authentication. Then, API server validates if the request is allowed or not based on requests attributes and policies, and eventually some external services. The authorization modes are:
- Node Authorized: Kublet access kube API to read services, endpoints, Nodes,Pods; and Write Node status, Pod status and events
- ABAC: external access for the API; create API with policies; any changes in those files is necessary to restart the kube-apiserver
- RBAC: Define Roles instead of associate a user or group to a set of permissions.
- Webhook: external policies
- AlwasyAllow is the default.
- AlwasyDeny blocks all requests.
// Check acess:
$ kubectl auth can-i create deployments
$ kubectl auth can-i delete nodes
$ kubectl auth can-i create deployments --as dev-user
$ kubectl auth can-i create deployments --as dev-user --namespace test

// Identify auth mode configured in the cluster
$ cat /etc/kubernetes/manifests/kube-apiserver.yaml // ps -aux | grep authorization

// roles in all namespaces
$ kubectl get roles -A --no-headers | wc -l

//  Identify an account in a specific role in a namespace
$ kubectl get roles
$ kubectl describe rolebindings MY_ROLEBINDING -n MY_NS

// A specific user has access to GET pods
$ kubectl get pods --as dev-user

// Permission to the user1 to create, list and delete pods in the default namespace.
$ kubectl create role dev --verb=list,create,delete --resource=pods
$ kubectl describe role dev
$ kubectl create rolebinding user-binding --role=dev --user=user1
$ kubectl describe rolebinding user-bindingIt is used to give permissions in cluster scopes like view, create or delete Nodes. (e.g cluster admin).
$ kubectl create clusterrole pod-role --verb=get,list,watch --resource=pods
$ kubectl get clusterrolesIt links the user to the clusterrole.
$ kubectl create clusterrolebinding cluster-admin --clusterrole=cluster-admin
$ kubectl get clusterrolebindings
$ kubectl describe clusterrolebindings cluster-admin
$ kubectl describe clusterrole cluster-admin

// Add permission to a Node for a new user
$ kubectl get nodes --as user1
$ kubectl create clusterrole user1-role --verb=get,list,watch --resource=nodes
$ kubectl create clusterrolebinding user1-rolebinding --clusterrole=user1-role --user=user1
$ kubectl describe clusterrole user1-role
$ kubectl describe clusterrolebindinguser1-rolebinding

// Adding permission to storage
$ kubectl api-resources // get the names os the storage would you like
$ kubectl create clusterrole storage-role --resource=persistentvolumes,storageclasses --verb=list,get,watch,create
$ kubectl get clusterrole storage-role // you can use '-o yaml' to see in the specific format
$ kubectl create clusterrolebinding user1-storage-rolebinding --user=user1 --clusterrole=storage-role
$ kubectl --as user1 get storageclassIt intercept the request after the authorization and authentication but before persist the objects. It can modify the object (Mutating). Admission controllers limit requests to create, delete, modify objects; it can also block custom verbs, however, it cannot block requests to read (get, watch or list) objects.
// View enable admission controllers
$ k exec kube-apiserver-controplane -n kube-system --kube-apiserver -h | grep enable-admission-plugins
$ ps aux | grep kube-apiserver | grep privileged
$ vi /etc/kubernetes/manisfest/kube-api-server.yaml
$ watch crictl ps // kube-apiserver restart after any change ok

// in case of error check logs
$ ls /var/log/pods/
$ ls /var/log/containersA security context defines privilege and access control settings for a Pod or Container.
apiVersion: v1
kind: Pod
metadata:
  name: pod-name
spec:
  securityContext:
    runAsUser: 1000
  containers:
  - ...
    securityContext:
      allowPrivilegeEscalation: false
      capabilities:
        add: ["SYS_TIME"]
Job
A Job creates one or more Pods and will continue to retry execution of the Pods until a specified number of them successfully terminate.
$ k create job --image=nginx my-job --dry-run=client -oyaml > my-job.yaml
// add completions: 10 and backoffLimit: 6 in spec, and command "sh -c 'Hello!!!'" in container.
$ vi my-job.yaml
$ k create -f my-job.yaml
$ watch kubectl get jobs
CronJob
ConJob is a resource in K8s that schedule jobs to execute repeatable actions.
Hands On
Step 0 - Prepare local environment
The first steps are to install the tools necessary to make it works. It means install docker, kubectl and colima. After that you can start colima with kubernetes.
$ brew install docker
$ brew install kubectl
$ brew install colima
$ colima start --kubernetes
Step 1 - prepare the image
Considering you will create your image, we have to create the image from a project and send it to the Docker Hub. More details about Docker and commands you can see here. For our example we are using this github code.
// create the image
$ docker build -t demo-k8s-vol .
// run the container with a named volume
$ docker run -p 3000:8080 -d --name demo-vol --rm -v storage:/app/storage demo-k8s-vol
// List the resources created
$ docker images
$ docker volume ls
$ docker ps
Now you have everything to test. So, do the tests using a browser and a tool for requests (Postman, Insomnia, IntelliJ).
http://localhost:3000/
GET http://localhost:3000/users
POST http://localhost:3000/users -> {"name": "test"}
After you've checked everything is ok, you can send your image to your Docker Hub. For our local tests purpose, also is possible to used the local image.
// This remote image has to be the same created in your hub
$ docker tag demo-k8s-vol YOUR_PATH/demo-volume
$ docker login
$ docker push YOUR_PATH/demo-volume
Step 2 - Check the goals and plane your actions
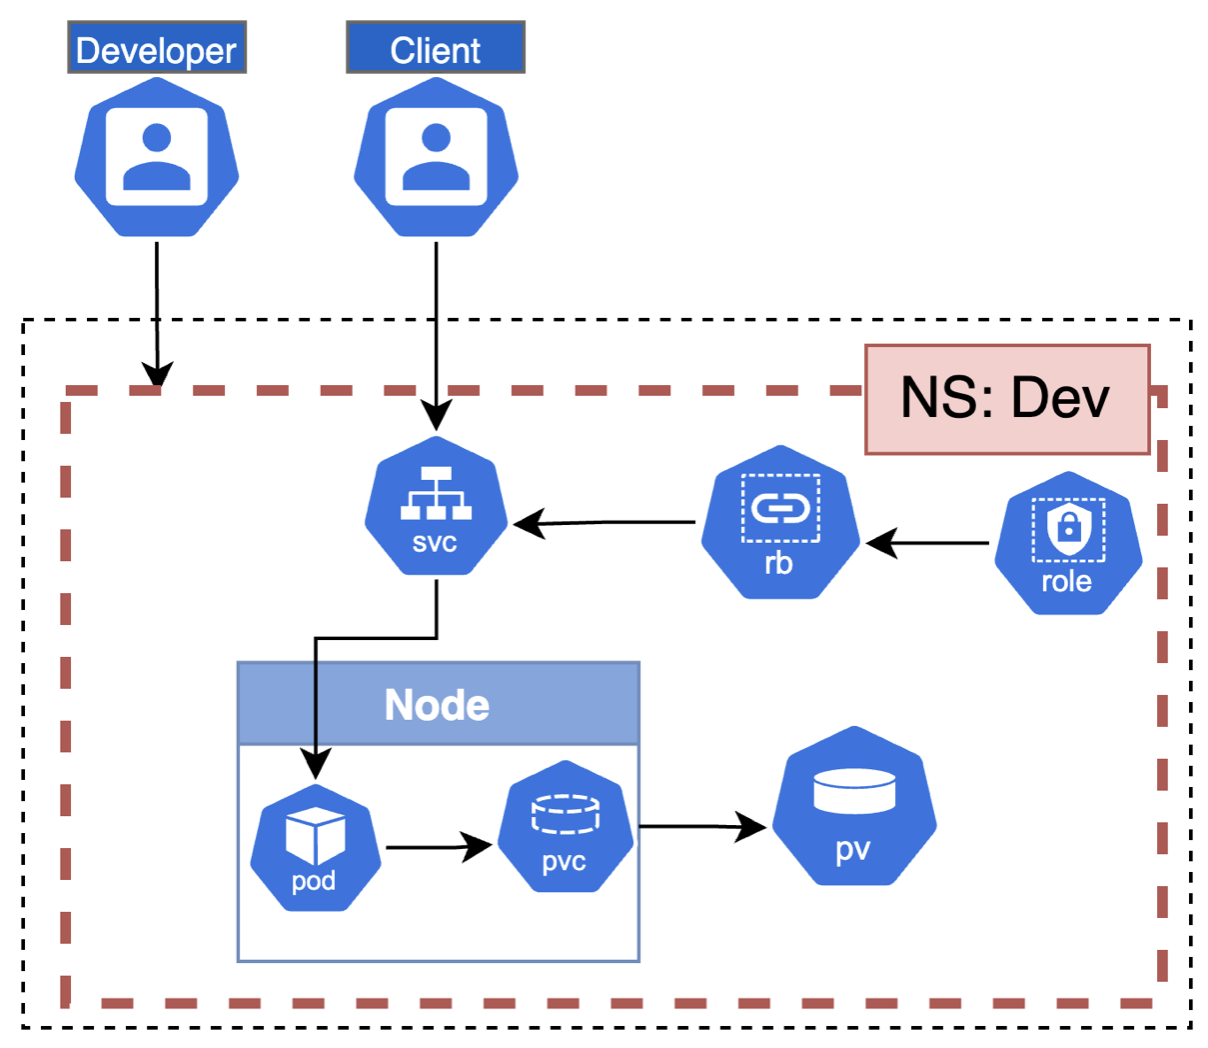
For this scenario let's create the objects in kubernetes locally and allow to do the same tests we did before. Beside the access, let's create roles to a user 'developer' can create all the objects.
Step 3 - Action
Considering the idea to practices the user restriction, let's start for this. Check your '~/.kube/config' file. Then, we will create a role and link it with the colima user.
$ kubectl config view
$ kubectl config set current-context colima // after test, let the original file
$ kubectl auth can-i create pods —as colima

$ k create namespace dev
$ kubectl create role dev-role --verb=list,get,watch,create,delete --resource=service,persistentvolumeclaims,pod -n dev
$ kubectl create rolebinding dev-rb --role=dev-role --user=colima  -n dev

// Optional steps
// If you need edit any objects created, you can create a file, edit and create again
$ k get role dev-role -n dev -o yaml > role-definition.yaml
$ vi role-definition.yaml
$ k delete role dev-role -n dev
$ k create -f role-definition.yaml
Now, let's create the volume that will be used by the Pod. For that, we will create an environment variable to be used to identify the folder name for store data. Then, we will create a deployment with the pod with the reference to the environment and our image. If you want to use your local image you have to add the attribute 'imagePullPolicy=Never'. The last step is to create the service to expose the application. All these files are in the Github project.
$ k create -f pv-definition.yaml -n dev
$ k create -f pvc-definition.yaml -n dev

$ k create -f environment.yaml -n dev
$ k get configmaps -n dev
$ k create -f deployment.yaml -n dev
$ k get deployments -n dev
$ k get svc -n dev

$ k expose deployment demo-deploy --type=LoadBalancer --port=8080 --target-port=8080 --name demo-service -n dev
Now you have everything to test again.
http://localhost:8080/
POST http://localhost:8080/users -> {"name": "test"}
GET http://localhost:8080/users
Step 3 - Rollout
Now, let's change something in the project and create the image again. Pay attention to the fact that the image has to have a new tag to be recognized as a different image.
$ docker build -t YOUR_PATH/demo-volume:v2 .
$ docker push YOUR_PATH/demo-volume:v2    // do this if you are using a remote image

// update the deployment
$ k set image deployment/demo-deploy demo-k8s=fabianafreire/demo-volume:v2 -n dev

// check the deployment status
$ k rollout status deployments/demo-deploy -n dev
$ k get pods
As a last step for practice purposes, let's use an image that does not exist.
$ k set image deployment/demo-deploy demo-k8s=test -n dev
$ k rollout status deployments/demo-deploy -n dev // blocked waiting for the immage (crt+c)
$ k get pods -n dev // there is an error but none of the other was finished

// rollback
$ k rollout undo deployment/demo-deploy -n dev
$ k rollout status deployment/demo-deploy -n dev
$ k get pods -n dev // the pod with error doesnot exist

$ k rollout history deployment/demo-deploy -n dev

// you can go to any revision
$ k rollout history deployment/demo-deploy -n dev --revision=3
$ k rollout undo deployment/demo-deploy --to-revision=1
Step 4 - Minikube
Optionally, you can intall minikube to try an interface to manage the K8s objects. It is a good option because it will help you become familiar with those kinds of tools.
$ minukube start     // Create a minikube cluster
$ minikube dashboard // Open the browser

// One step more to expose the service because of menikube
// Use this URL to access the application
$ minikube service demo-deploy
You can repeat all the steps to create the objects in a cluster without the namespace and see the results in minikube.
Also, you can try with this application: kubernetes-security-nodejs-mysql. It has example of insecure and secure application with the best practices.
Step 5 - Extra practice
First of all, let's create a new node to add k8s objects. In localhost is allow only one node. For exercice purpuse, let's pretend it works :D.
// Create a new node from a JSON file
{
  "kind": "Node",
  "apiVersion": "v1",
  "metadata": {
    "name": "node01",
    "labels": {
      "name": "node01"
    }
  }
}
$ k create -f node01.json

// Add Taint to node 01
$ k taint node node01 app_type=alpha:NoSchedule

// add new label - be used by affinity
$ k label node node01 app_type=beta
Now we are available to create deployment and service to that node by affinity and add rules of telerations. Also, you can assign a pod to a node by attribute.
$ k create deployment test-app --image=nginx --replicas=1 --dry-run=client -oyaml > test-dep.yaml
// add tolerations aatt in template.spec section and nodeAffinity
tolerations:
  - effect: NoSchedule
    key: app_type
    value: alpha
affinity:
  nodeAffinity:
    requiredDuringSchedulingIgnoredDuringExecution:
      nodeSelectorTerms:
      - matchExpressions:
        - key: app_type
          operator: In
          values: ["beta"]

$ k create -f test-dep.yaml
$ k get pod -o wide               // check node
$ k describe pod test-app-XXXXX   // check error in pod

$ k expose deployment test-app --name test-app-service --type NodePort --port 80 --dry-run=client -oyaml > service-app.yaml
$ vi service-app.yaml // add nodePort: 30080
$ k create -f service-app.yaml
$ k get svc
For practices purpose, lets add readiness and liveness attributes to the pods. The liveness probes is used to decide when restart a container, and the readiness is used to identify when a container is ready to start accepting traffic.
// readinessProbe + livenessProbe: add the atts inside container
$ vi test-dep.yaml
readinessProbe:
  httpGet:
    path: /healthcheck
    port: 8080
livenessProbe:
  exec:
    command: ["echo 'Hello World!'"]
  initialDelaySeconds: 10
  periodSeconds: 60
$ k replace -f test-dep.yaml --force
Now let's create an Ingress that will redirect and call to that service.
// Ingress
$ k create ingress ingress --rule="www.example.com/users*=test-app-service:80"
$ k get ingress