Angular - Component
Introduction
The first post about Angular was related to how to create the first project. Now we will give another step, component.
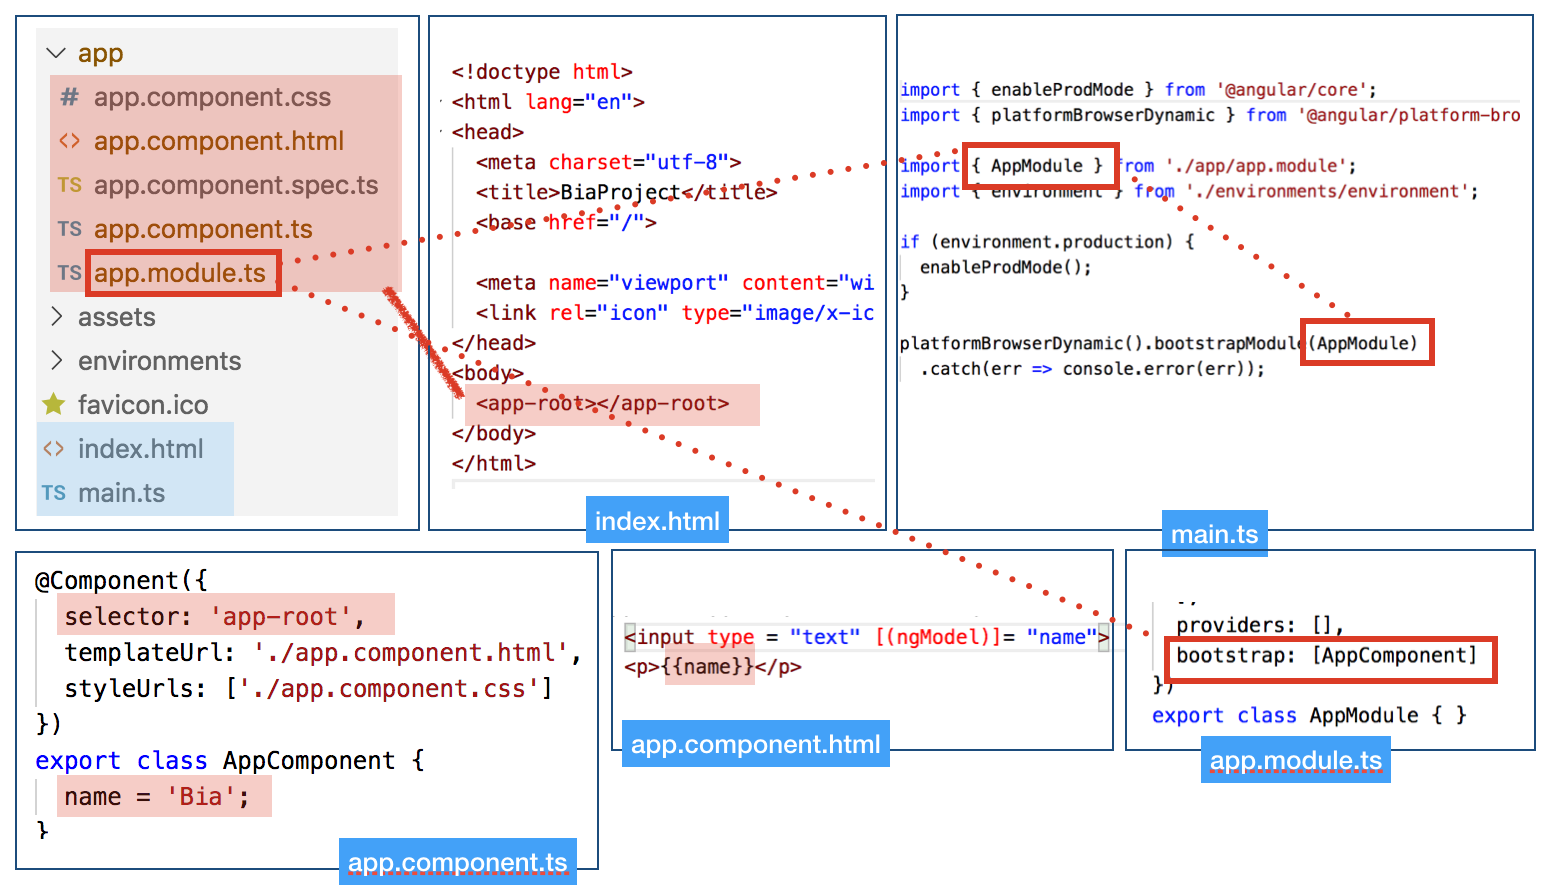
When the project is created, a default component (or root) is present. It is used in the index.html to start all the process and to be rendered by Angular.
How the magic happens?!
The app.component.ts file will have the selector which declare the tag that you will use. The index.htm has the reference to the app-root tag. Then, Angular will put what is defined to this tag, that is in the app.component.html. The main.ts declare the root node (or root component) to start the application.
A new component will have the same structure, and to use that you need to put its tag where you wish how many times you guess it’s necessary.
Creating a new Component
The components are the key feature in Angular that represents the functional parts of the application that interact with Html. It represents the view. Every component has a class with data and behaviours. The class is identified by @Component decorator.
To create a component is very simple. The commands are:
// Complete command
ng generate component new-cmp
// Simplified command
ng g c new-cmp
// A component inside another one
ng g c component_path/new-cmp
When you do this, a new component is created with a folder, their files and references in app.module.ts. Considering the new components servers, the new structure is shown below.

Every component has:
- new-cmp.component.css: it's to appearance
- new-cmp.component.html: it's displayed on the browser for the component template. Templates are HTML + directives + binding markup. Template directives provide program logic. Binding markup (event, property) connects your application data and the DOM.
- new-cmp.component.spec.ts: it's related to unit test
- new-cmp.component.ts: it defines the module, properties, etc. The class implements OnInit. The method ngOnInit created is called when the class is executed.
Component Metadata
The CLI generated three metadata properties inside of new-cmp.component.ts:
- selector: the component's CSS element selector. It's possible declare the tag that will be used or such a tag's attribute.
- templateUrl: the location of the component's template file. It's possble use just 'template' and add code inline.
- styleUrls: the location of the component's private CSS styles.
Every metadata can be declared inline commands.
Lifecycle
Every component has a lifecycle controlled by Angular that creates, render the component and its children, checks for updates, and destroy the component to remove from DOM.

In terms of “calls”, the lifecycle can be executed through the list of methods:
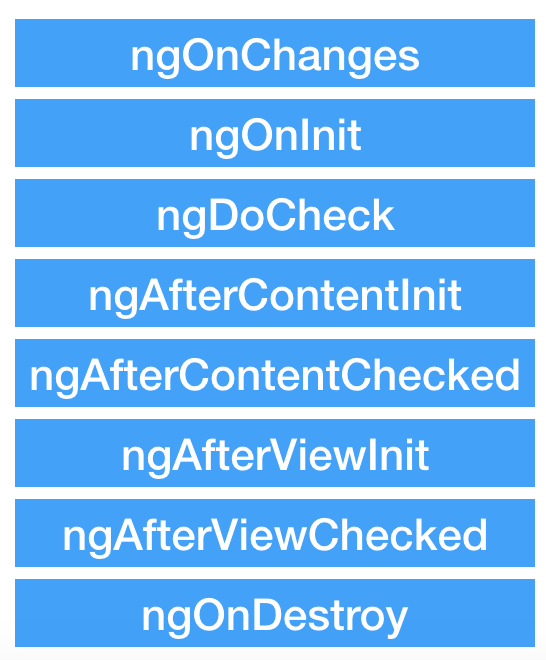
When start the page, the sequence os methods are called: (1) Constructor, (2) ngOnChanges, (3) ngOnInit, (4)ngDoCheck, (5) ngAfterContentInit, (6) ngAfterContentChecked, (7) ngAfterViewInit, (8) ngAfterViewCheck. In case finish the page, the (9) ngOnDestroy is called. In case some input be changed, some of these methods will be called again: ngOnChange, ngDoChek, ngAfterContentChecked, ngAfterViewCheked.
Constructor vs ngOnInit: The first one is a TypeScript concept, and the second one is a Angular concept. In construct there are no access to the components because they were not initialized while ngOnInit event is fired after binding the UI and the component is initialized. The constructor should be used to initialized class variables or DI.
It's possible to work inside the phases to do several treatments using interfaces. One example is the OnInit interface and use ngOnInit method to load data. Other scenario is when is necessary to identify the changes but is not possible to use the events. In this case is possible use the method ngOnChanges. In this case, this method will be called in every change. You can add the strategy "OnPush" to guarantee to start the method only when the inputs are changed.
changeDetection: ChangeDetectionStrategy.OnPush
Then, use their methods to implement some behaviour that is necessary for the specific phase. However, be careful to with these interventions on the life cycle.
PS: Even though the use of interfaces in some methods is not mandatory, like ngOnChanges, it is a good practice to add these references to make it clear that you are overloading the method.
References
- https://angular.io/tutorial/toh-pt3
- https://www.tutorialspoint.com/angular7/angular7_components.htm