NestJS - using the main components
This post has some notes and the code I did while studying nestjs. My references are the udemy course NestJS: The Complete Developer's Guide and the nest page. The code used in this post you can find the projects messages and messages-level-2 that you can access here.
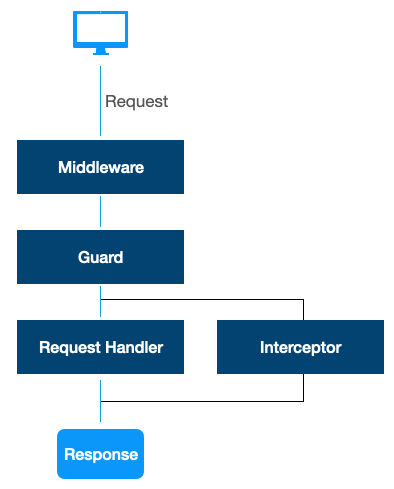
The components will be shown here are:
Introduction
NestJS is a javascript-based framework that improve the use of the Node.js
Node.js is an open-source and cross-platform JavaScript runtime environment. Node.js runs the V8 JavaScript engine, the core of Google Chrome, outside of the browser. A Node.js app runs in a single process, without creating a new thread for every request. Node.js has a unique advantage because millions of frontend developers that write JavaScript for the browser are now able to write the server-side code in addition to the client-side code without the need to learn a completely different language. [1]
NestJS is a framework for building efficient, scalable Node.js server-side applications. It makes use of robust HTTP Server frameworks like Express (the default) and optionally can be configured to use Fastify as well! Nest provides a level of abstraction above these common Node.js frameworks (Express/Fastify), but also exposes their APIs directly to the developer. Nest provides an out-of-the-box application architecture which allows developers and teams to create highly testable, scalable, loosely coupled, and easily maintainable applications. The architecture is heavily inspired by Angular.[2]
Step 0
The NestJS project or components can be done manually or using the NestCLI. Use CLI is more practical because it creates the basic structure for you. You need to have the Node.js.
Here are the first steps to create your first project.
# Install CLI
$npm i -g @nestjs/cli
# Check version
$nest -v
# Create the PROJECT - you can select between npm or yarn
$nest new my-project
# To create without the CLI the command is
# cd projectfolder
# npm init -y'
# Go inside your project folder
$cd my-project
# Update the dependencies
$npm install
# Start the app - localhost:3000 to test
$npm run start:dev
Among all those files created by the framework you will have the eslink, package and tsconfig. The first one you will find configs regarding the code format. Inside the second one will be information regarding app configurations as dependencies and scripts. And the last one you will have, for instance, compile information.
The code format you can use the plugin Prettier to help you to keep the code conventions. In your dependencies you will see, for example, @nestjs/common, @nestjs/core, @nestjs/platform-express, reflect-metadata and typescript. And regarding the tsconfig I'd like to note three attributes:
- experimentalDecorators: The property responsible for allow (or not allow) decorator usage on the code.,
- emitDecoratorMetadata: Not used in angular but necessary to nestjs,
- target: signifies which target of JavaScript should be emitted from the given Typescript
More details about the files created by the CLI you can see here.
Next Steps
Now we have the first project. Next step is to create the components you need to your application. They can be Controllers, Services, Modules, Pipes, Filters, Guards, Interceptors and Repositories.
Nest JS follow the Angular in many aspects. So, if you know Angular, you will see many similarities here.
MODULE
# Create a module
$ nest g module messages
The first component usually you will create is the module. It is used to organize the application.
Notes[3]
- A module is a class annotated with a @Module() decorator. The @Module() decorator provides metadata that Nest makes use of to organize the application structure.
- Modules declare the providers, controllers, all dependencies (imports), and what will be available to other modules (exports) A feature module simply organizes code relevant for a specific feature, keeping code organized and establishing clear boundaries. This helps us manage complexity and develop with SOLID principles
- Is necessary to be declared in the root module.
- Every module is automatically a shared module. In Nest, modules are singletons by default, and thus you can share the same instance of any provider between multiple modules effortlessly.
- Modules can re-export modules that they import making it available for other modules which import this one. module classes themselves cannot be injected as providers due to circular dependency.
- Nest, encapsulates providers inside the module scope. When you want to provide a set of providers which should be available everywhere out-of-the-box make the module global with the @Global() decorator.
# messages.module.ts
@Module({
  controllers: [MessagesController],
  providers: [MessagesService, MessagesRepository],
})
export class MessagesModule {}

# Declaring MessagesModule as the main module of the application
# main.ts
async function bootstrap() {
  const app = await NestFactory.create(MessagesModule);
  app.useGlobalPipes(new ValidationPipe());
  await app.listen(3000);
}
bootstrap();
PIPES
Notes: [4]
- A pipe is a class annotated with the @Injectable() decorator, which implements the PipeTransform interface.
- In both cases, pipes operate on the arguments being processed by a controller route handler. Nest interposes a pipe just before a method is invoked, and the pipe receives the arguments destined for the method and operates on them. Any transformation or validation operation takes place at that time, after which the route handler is invoked with any (potentially) transformed arguments.
- Pipes run inside the exceptions zone. when an exception is thrown in a Pipe, no controller method is subsequently executed.
- The Joi library allows you to create schemas in a straightforward way, with a readable API. Let's build a validation pipe that makes use of Joi-based schemas.
- Alternative: class-validator library
# Using pipe globally - main.ts
async function bootstrap() {
  const app = await NestFactory.create(MessagesModule);
  app.useGlobalPipes(new ValidationPipe());
  await app.listen(3000);
}
bootstrap();
Here other example using a pipe in the parameter method in controller. Considering you test using as a consult 'messages/asd'. If you use th pipe then the return will be an error with status code 400 (Validation failed). If not, the return will be 404 (Not found)
@Get('/:id')
async getMessage(@Param('id', ParseIntPipe) id: number)
SERVICE
# Create the first service
# Inside the module messages create a service called messages
$ nest g service message
The service is any class you need add some business logic.
@Injectable()
export class MessagesService {
  constructor(public messagesRepo: MessagesRepository) {}

  async findOne(id: string) {
    return this.messagesRepo.findOne(id);
  }

  async findAll() {
    return this.messagesRepo.findAll();
  }

  async create(content: string) {
    return this.messagesRepo.create(content);
  }
}
The '@Injectable' decorator make it possible to be used by the controller. The nest handle the instance to be used through the application.
The example shows the service being used by Dependency Injection.
CONTROLLER
# Create the first controller
# Inside the module message create a controller called messages
$nest g controller messages
Notes [5]
- Controllers are responsible for handling incoming requests and returning responses to the client.
- The routing mechanism controls which controller receives which requests
- Decorators (@Controller/@Get/@Param/@Body) associate classes with required metadata and enable Nest to create a routing map
- The route path for a handler is determined by concatenating the (optional) prefix declared for the controller, and any path specified in the method's decorator.
- The route parameter token used to capture dynamic value at the position in the request URL(/:id)
- Scope:In Nest, almost everything is shared across incoming requests. Node.js doesn't follow the request/response Multi-Threaded Stateless Model in which every request is processed by a separate thread. Hence, using singleton instances is fully safe for our applications.
- A DTO is an object that defines how the data will be sent over the network. It's recommended use classes instead interface because they are preserved as real entities in the compiled JavaScript. On the other hand, since TypeScript interfaces are removed during the transpilation, Nest can't refer to them at runtime.
PS: When you use @Res from external library the developer is responsible to the response now. To fix this, you can use the attribute "passthrough" to do what you need and let the rest with the framework.
# The endpoint here is: /messages

@Controller('messages')
export class MessagesController {

  constructor(public messagesService: MessagesService) {}

  @Get()
  findAll(@Res({ passthrough: true }) res: Response) {
    res.status(HttpStatus.OK);
    return [];
  }

  @Get()
  listMessages() {
    return this.messagesService.findAll();
  }

  @Post()
  createMessage(@Body() body: CreateMessageDto) {
    return this.messagesService.create(body.content);
  }

  @Get('/:id')
  async getMessage(@Param('id') id: string) {
    const message = await this.messagesService.findOne(id);

    if (!message) {
      throw new NotFoundException('message not found!!!');
    }

    return message;
  }

}

# DTO
export class CreateMessageDto {
  @IsString()
  content: string;
}
This example use DTO with decorator from 'class-validator' library. You need to install it. ($npm install class-validator)
CUSTOM DECORATOR
One option is customize one decorator if you need.
# Message DECORATOR
export const CurrentMessage = createParamDecorator(
  (data: never, context: ExecutionContext) => {
    const request = context.switchToHttp().getRequest();
    console.log('--> Starting Decorator...');
    request.message = 'Hello Big World!';
    return request.currentUser;
  },
);

# Using in the controller
@Get()
@UseGuards(MessagesGuard)
listMessages(@CurrentMessage() message) {
  console.log('Result my decorator: ' + message);
  return this.messagesService.findAll();
}

# Order Printed
---> Starting Messages Module...
---> Starting middleware...
--> Starting Messages Guard ....
--> Starting Decorator...
PROVIDER
Notes: [5]
- Many of the basic Nest classes may be treated as a provider – services, repositories, factories, helpers, and so on. The main idea of a provider is that it can be injected as a dependency; this means objects can create various relationships with each other,
- Controllers should handle HTTP requests and delegate more complex tasks to providers
- create a service and add @Injectable
- The @Injectable() decorator attaches metadata, which declares that CatsService is a class that can be managed by the Nest IoC container.
- Declare inside the constructor you want to use. The service will be injected. Nest has a built-in inversion of control ("IoC") container that resolves relationships between providers
- Scope: Providers normally have a lifetime ("scope") synchronized with the application lifecycle
- The service will be available to injection and be accessed by to some consumer after it is register in the module.
The example in 'modules' show how to declare the providers.
@Module({
  providers: [MessagesService, MessagesRepository],
  controllers: [MessagesController],
})
export class MessagesModule {...}
First Test
Here we are available to do our first test. To make it possible was created a simple class called MessagesRepository to simulate any source. It was created the messages.json to return data to the test.
# Class
@Injectable()
export class MessagesRepository {
  ...
  async findAll() {
    const contents = await readFile('messages.json', 'utf8');
    return JSON.parse(contents);
  }
  ...
}

# messages.json
{
  "12": {
    "content":"hi there","id":12
    },
    ...
}

# Start the app and access localhost:3000/messages
$ npm run start:dev
PS: You'll need to install the 'class-validator' and 'class-transformer' library to test the code.
You can download the code and run:
$ npm install
$ npm run start:dev

# access browser
http://localhost:3000/messages
Steps forward
Now let's add more complexity to the code using more resources from nestjs. The code regarding this second part you will find here
MIDDLEWARE
Notes: [6]
- Middleware is a function which is called before the route handler. Middleware functions have access to the request and response objects, and the next() middleware function in the application’s request-response cycle.
- You implement custom Nest middleware in either a function, or in a class with an @Injectable() decorator. The class should implement the NestMiddleware interface, while the function does not have any special requirements.
- There is no place for middleware in the @Module() decorator. Instead, we set them up using the configure() method of the module class. Modules that include middleware have to implement the NestModule interface.
- it's not possible to create generic middleware which can be used across all contexts across the whole application. This is because middleware is unaware of the execution context, including the handler that will be called and any of its parameters. Instead use Pipe.
You have to create your middleware and declare it inside your module.
# Messages Middleware
@Injectable()
export class MessagesMiddleware implements NestMiddleware {
  use(req: Request, res: Response, next: NextFunction) {
    console.log('Starting middleware...');
    console.log(req);
    console.log(res);
    next();
  }
}

# Messages Module
export class MessagesModule {
  configure(consumer: MiddlewareConsumer) {
    consumer.apply(MessagesMiddleware).forRoutes('*');
  }
}
When you run your app the order of print will be:
---> Starting Messages Module...
---> Starting middleware...
/messages
[Function: status]
GUARDS
Notes: [7]
- Guards have a single responsibility.
- They determine whether a given request will be handled by the route handler or not, depending on certain conditions (like permissions, roles, ACLs, etc.) present at run-time. This is often referred to as authorization.
- Guards have access to the ExecutionContext instance, and thus know exactly what's going to be executed next.
@Injectable()
export class MessagesGuard implements CanActivate {
  canActivate(context: ExecutionContext) {
    const request = context.switchToHttp().getRequest();
    console.log('Starting Messages Guard ....');
    console.log(request.url);

    return true;
  }
}
Now, the order of the print in your terminal will be:
---> Starting Messages Module...
---> Starting middleware...
/messages
[Function: status]
Starting Messages Guard ....
/messages
Exception filters
Notes: [8]
- Nest comes with a built-in exceptions layer which is responsible for processing all unhandled exceptions across an application. When an exception is not handled by your application code, it is caught by this layer, which then automatically sends an appropriate user-friendly response.
- Out of the box, this action is performed by a built-in global exception filter, which handles exceptions of type HttpException (and subclasses of it). When an exception is unrecognized (is neither HttpException nor a class that inherits from HttpException), the built-in exception filter generates the InternalServerErrorException
- Nest provides a set of standard exceptions that inherit from the base HttpException. These are exposed from the @nestjs/common package, and represent many of the most common HTTP exceptions
- Exception filters are designed for exactly this purpose. They let you control the exact flow of control and the content of the response sent back to the client.
- Global filter can be declared in main.js using "useGkibakFilters" method or in AppModule in providers using APP_FILTER.
- If you want to override the behavior based on certain factors you can simply extend the built-in default global exception filter (BaseExceptionFilter).
Here is the example how to create your own exception, and how controller is throws it.
# Your exception
export class MyException extends HttpException {
  constructor() {
    super('My exception', HttpStatus.FORBIDDEN);
  }
}

@Get('/exception/test')
async testException() {
  throw new MyException();
}

# The return
{
  "statusCode": 403,
  "message": "My exception"
}
You just need to create it and declare in your method to use the filter. The @Catch decorator defines which exception is related to the filter.
# The controller
@Get('/exception/test')
@UseFilters(new MyExceptionFilter())
async testException() {
  throw new MyException();
}

# The Filter
@Catch(MyException)
export class MyExceptionFilter implements ExceptionFilter {
  catch(exception: HttpException, host: ArgumentsHost) {
    console.log('--> Starting exception filter...');

    const context = host.switchToHttp();
    const response = context.getResponse<Response>();
    const request = context.getRequest<Request>();
    const status = exception.getStatus();

    response.status(status).json({
      statusCode: status,
      timestamp: new Date().toISOString(),
      path: request.url,
    });
  }
}

# The return
{
  "statusCode": 403,
  "timestamp": "2022-04-25T18:17:07.092Z",
  "path": "/messages/exception/test"
}

# The terminal (The guard is printed when you are using the @UseGuards decorator)
---> Starting Messages Module...
---> Starting middleware...
--> Starting Messages Guard ....
--> Starting my exception...
--> Starting exception filter...
INTERCEPTORS
Notes: [8]
- An interceptor is a class annotated with the @Injectable() decorator, which implements the NestInterceptor interface
- They make it possible to: bind extra logic before / after method execution, transform the result returned from a function, transform the exception thrown from a function, extend the basic function behavior, completely override a function depending on specific conditions (e.g., for caching purposes)
The interceptor can be used by method or to all class and be declared in the top of the class.
# The interceptor
@Injectable()
export class MessagesInterceptor implements NestInterceptor {
  intercept(context: ExecutionContext, handler: CallHandler<any>) {
    console.log('--> Starting interceptor...');
    const request = context.switchToHttp().getRequest();
    const { userId } = request.session || 'Test';

    return handler.handle();
  }
}


# The controller method
@Get()
@UseGuards(MessagesGuard)
@UseInterceptors(MessagesInterceptor)
listMessages(@CurrentMessage() message) {
  console.log('Result my decorator: ' + message);
  return this.messagesService.findAll();
}

# The terminal
---> Starting Messages Module...
---> Starting middleware...
--> Starting Messages Guard ....
--> Starting interceptor...
--> Starting Decorator...
In case happen some exception the result is shown below
#The controller
@Get()
@UseGuards(MessagesGuard)
@UseInterceptors(MessagesInterceptor)
@UseFilters(new MyExceptionFilter())
listMessages(@CurrentMessage() message) {
  throw new MyException();
}

# The terminal
---> Starting Messages Module...
---> Starting middleware...
--> Starting Messages Guard ....
--> Starting interceptor...
--> Starting Decorator...
--> Starting my exception...
--> Starting exception filter...
Conclusion
This post goes around the basic topics using the udemy course and main nestjs page as a reference. Next post I'll try to go deeper in the topics such as cookies, session and much more.
See you!!