Spring Batch
Some application has processes that spend a lot of time to execute and can to compromise the performance of the app. Also can exist processes that need to execute in a specific time (automated task ). Spring Batch, which is part of the Spring EcoSystem, can give this support.
A lightweight, comprehensive batch framework designed to enable the development of robust batch applications vital for the daily operations of enterprise systems.
The spring batch executes a set of jobs without user interaction. It's useful when is necessary, for example, process periodic events that can impact the performance of the application. So, the process can be scheduled to be processed in moments where the access to the application is not so intense.
Using this kind of framework is possible to process a huge number of transactions as a set and restart in the last point where the process can be interrupted. In other words, automatic retry after failure.
The process is a job that can have one or more steps. The steps usually follow the sequence: read, process and write.
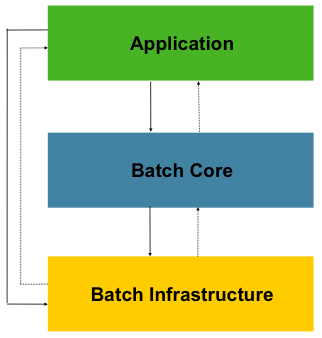
Architecture
The architecture of Spring Batch has three parts:
- Application: contains all batch jobs and custom code written by developers
- Core: contains the core runtime classes necessary to launch and control a batch job
- infrastructure: contains common readers and writers, and services used both by application developers and the core framework itself
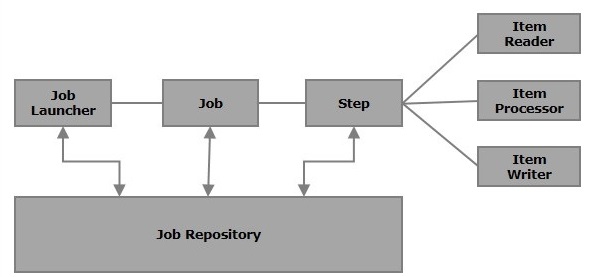
Components
The mains components of Spring Batch are:
- Job: it is the batch process to be executed. It can be divided into steps.
- Step: independent part of a job with information used in the job. The step is composed of:
- ItemReader: it reads data from a particular source
- ItemProcessor: optional - it processes the data read - a process to each record. A tasklet can act as a processor when no reader and writer are given, processing only a single task
- ItemWriter: it writes data to a particular destination.
- Job Launcher: interface to use parameters. SampleJoblauncher implements it.
- Job Repository: It provides CRUD operations for the JobLuncher, Job and STEP implementations. If you don’t want to persist in the database, you can configure the in-memory version of the jobRepository.
- Job Instance: represents the logical run of a job.
- Job Execution: represents the execution of a job
- Step Execution: represents the execution of a step
Example [CSV to XML]
For now, I'm going to show you an example and the first step is to add de dependencies into the pom file.
<dependency>
  <groupId>org.springframework</groupId>
  <artifactId>spring-oxm</artifactId>
  <version>5.0.3.RELEASE</version>
</dependency>
<dependency>
  <groupId>org.springframework</groupId>
  <artifactId>spring-jdbc</artifactId>
  <version>5.0.3.RELEASE</version>
</dependency>
<dependency>
  <groupId>org.springframework.batch</groupId>
  <artifactId>spring-batch-core</artifactId>
  <version>4.0.0.RELEASE</version>
</dependency>
After that, you need to create a configuration file (it can be more than one to organize your project) inside of the resources folder. Let's run an app that read from a CSV file to write into an XML file. Good different examples you can find here.
101, Joao, Learn Java, 06/05/2019
102, Maria F, Learn MySQL, 19/04/2019
103, Karlos Soares, Learn JavaFX, 06/07/2019
The configuration file will contain job, step, beans (readers and writers), JobLauncher, JobRepository, Transaction Manager and Data Source. It's possible to configure using XML file or Java class. The example is using XML config, but you can see an example using java in here.
The example below map a reader, a writer and a processor. The example read a csv, then the class used in the reader is the FlatFileItemReader and a mapper to parse the file. for the writer in an XML is used StaxEventItemWriter and a marshaller for serializing the object to XML. To see all possible classes you can see here.
<batch:job id="jobTest">
   <batch:step id="step1">
     <batch:tasklet>
       <batch:chunk reader="cvsFileItemReader" writer="xmlItemWriter"
          processor="itemProcessor" commit-interval="10">
       </batch:chunk>
     </batch:tasklet>
   </batch:step>
</batch:job>

<bean id="cvsFileItemReader"
  class="org.springframework.batch.item.file.FlatFileItemReader">
  <property name="resource" value="classpath:datasource.csv" />
  <property name="lineMapper">
    <bean
       class="org.springframework.batch.item.file.mapping.DefaultLineMapper">
       <property name="lineTokenizer">
         <bean
            class="org.springframework.batch.item.file.transform.DelimitedLineTokenizer">
            <property name="names"
               value="id, author, title, submission_date" />
         </bean>
       </property>
       <property name="fieldSetMapper">
         <bean class="br.study.spring.batch.Mapper" />
       </property>
     </bean>
  </property>
</bean>

<bean id="itemProcessor" class="br.study.spring.batch.Processor" />

<bean id="xmlItemWriter"
  class="org.springframework.batch.item.xml.StaxEventItemWriter">
   <property name="resource" value="file:out/testBatch.xml" />
   <property name="marshaller" ref="reportMarshaller" />
   <property name="rootTagName" value="javaBean" />
</bean>

<bean id="reportMarshaller"
  class="org.springframework.oxm.jaxb.Jaxb2Marshaller">
  <property name="classesToBeBound">
    <list>
      <value>br.study.spring.batch.JavaBean</value>
    </list>
  </property>
</bean>

<bean id="jobRepository"
  class="org.springframework.batch.core.repository.support.MapJobRepositoryFactoryBean">
  <property name="transactionManager" ref="transactionManager" />
</bean>

<bean id="transactionManager"
  class="org.springframework.batch.support.transaction.ResourcelessTransactionManager" />

<bean id="jobLauncher"
  class="org.springframework.batch.core.launch.support.SimpleJobLauncher">
  <property name="jobRepository" ref="jobRepository" />
</bean>
After that, we need to create java classes:
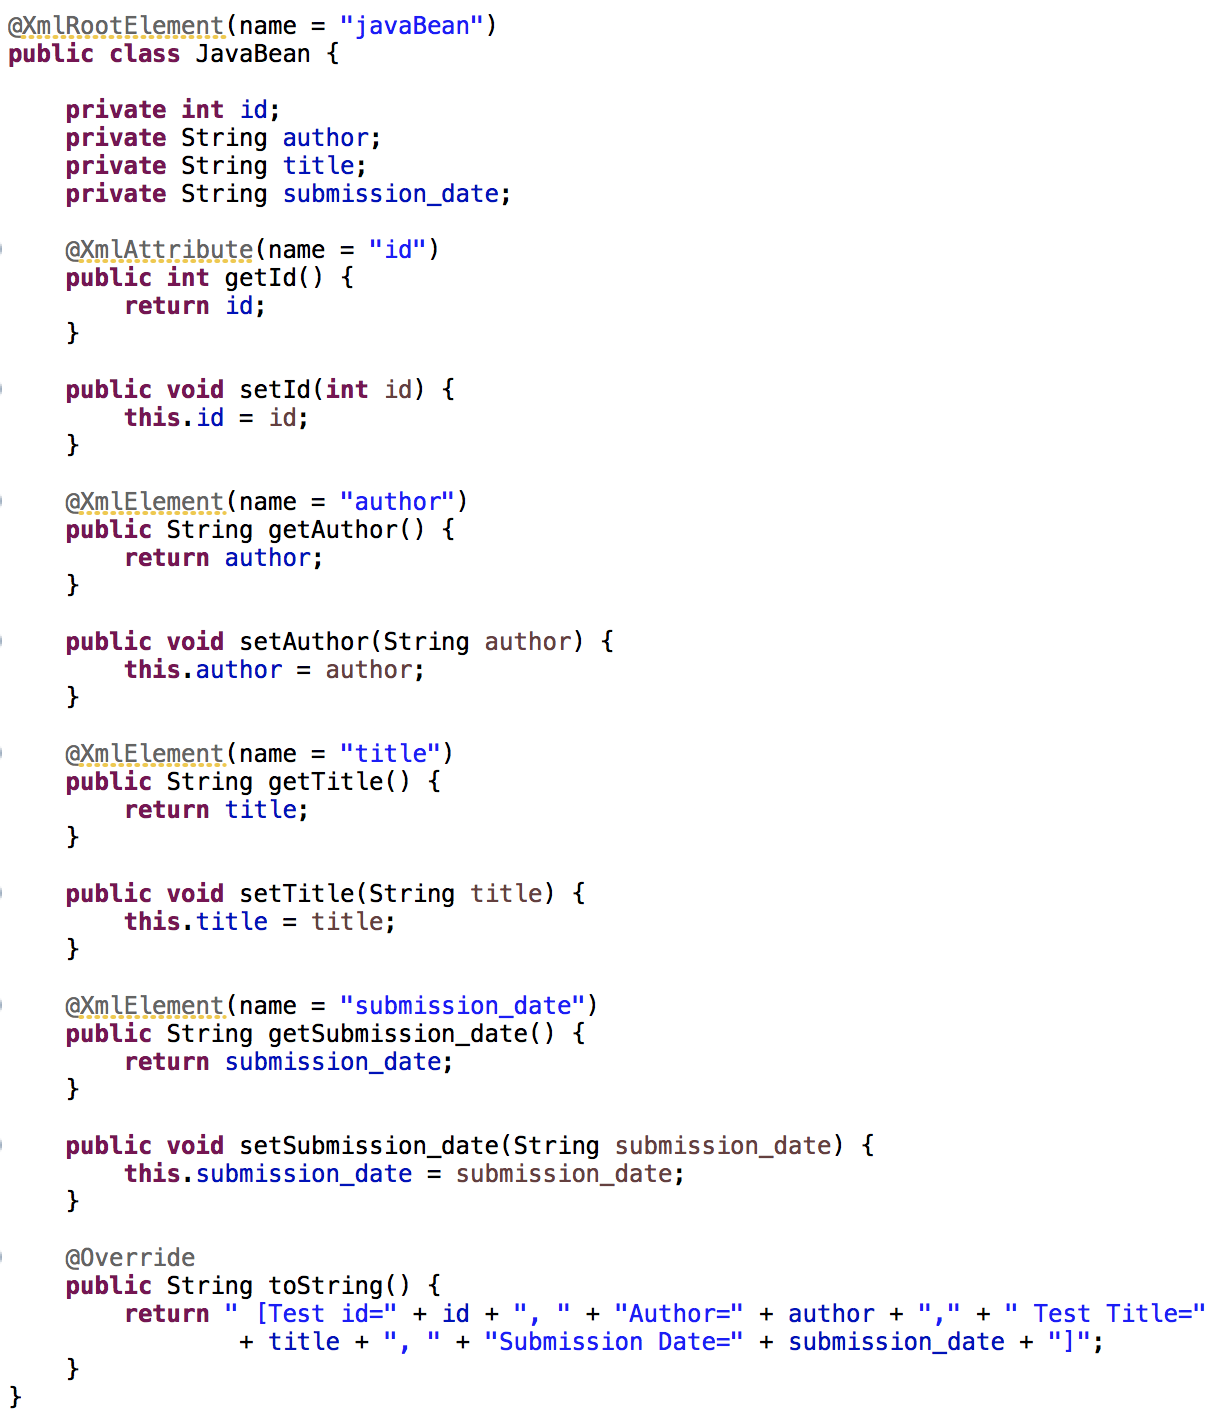
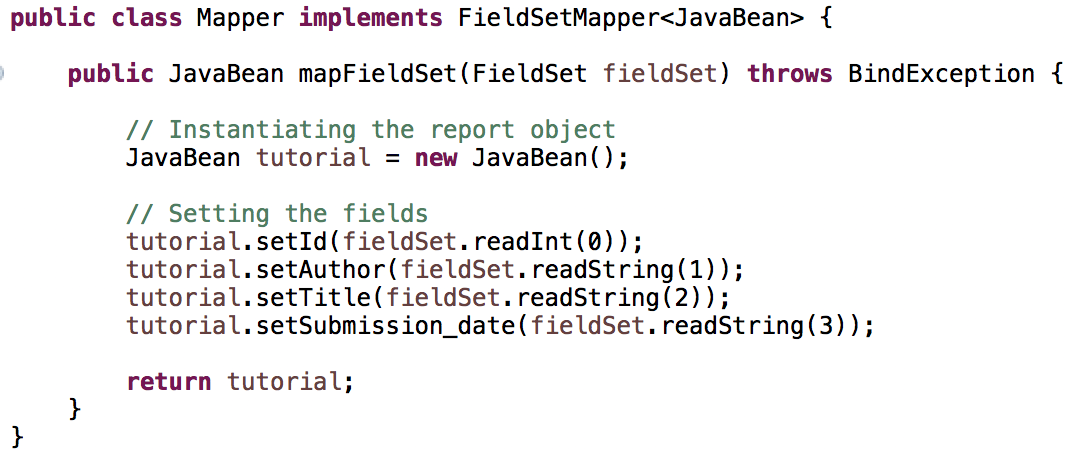
- Mapper Class: get data from the reader and set it to a Java Bean
- Java Bean: represents the data used by batch
- Tasklet/Processor: code to process the application (receive the data read, processes it, and return)
- Launcher Class: run the application
 |
 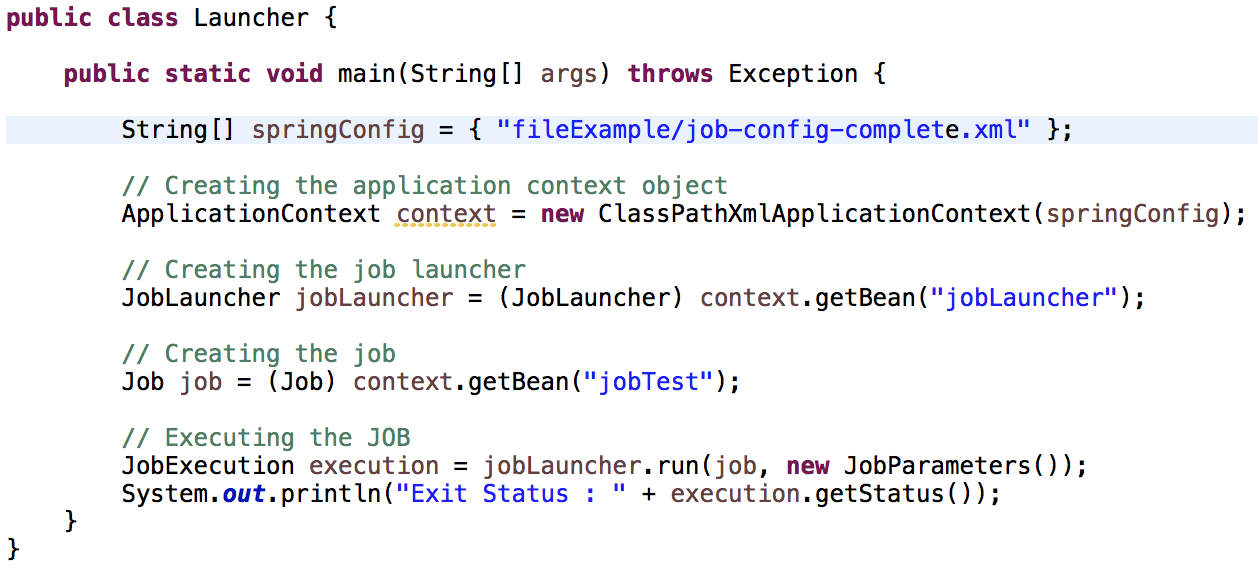  |
In case you are using a java class to config you just need to remove the lines in Launcher class related to xml file and to add the reference of the java class config. The complete example you can see here.
AnnotationConfigApplicationContext context = new AnnotationConfigApplicationContext();
context.register(SpringConfig.class);
context.refresh();
The result of the execution is:
<javaBeans>
   <javaBean id="101">
      <author>Joao</author>
      <submission_date>06/05/2019</submission_date>
      <title>Learn Java</title>
   </javaBean>
   <javaBean id="102">
      <author>Maria F</author>
      <submission_date>19/04/2019</submission_date>
      <title>Learn MySQL</title>
   </javaBean>
   <javaBean id="103">
      <author>Karlos Soares</author>
      <submission_date>06/07/2019</submission_date>
      <title>Learn JavaFX</title>
   </javaBean>
</javaBeans>
Example [XML to Database]
Now, to use a database to write the output you will need to change the itemWriter adding the SQL that will be used and to change the datasource reference. The example is based on tutorialspoint
# WRITER REFERENCE
<bean id="dbItemWriter"
	class="org.springframework.batch.item.database.JdbcBatchItemWriter">
	<property name="dataSource" ref="dataSource" />
	<property name="sql">
	  <value><![CDATA[
      insert into details.tutorials (tutorial_id, tutorial_author, tutorial_title, submission_date, tutorial_icon, tutorial_description)
      values (:tutorial_id, :tutorial_author, :tutorial_title, :submission_date, :tutorial_icon, :tutorial_description)]]></value>
	</property>

	<property name="itemSqlParameterSourceProvider">
		<bean class="org.springframework.batch.item.database.BeanPropertyItemSqlParameterSourceProvider" />
	</property>
</bean>

# DATASOURCE References

<bean id="dataSource"
	class="org.springframework.jdbc.datasource.DriverManagerDataSource">
	<property name="driverClassName" value="org.h2.Driver" />
	<property name="url" value="jdbc:h2:file:/tmp/jpadb" />
	<property name="username" value="sa" />
	<property name="password" value="" />
</bean>

<!-- create job-meta tables automatically -->
<jdbc:initialize-database data-source = "dataSource">
   <jdbc:script location = "org/springframework/batch/core/schema-drop-h2.sql"/>
      <jdbc:script location = "org/springframework/batch/core/schema-h2.sql"/>
</jdbc:initialize-database>
Run
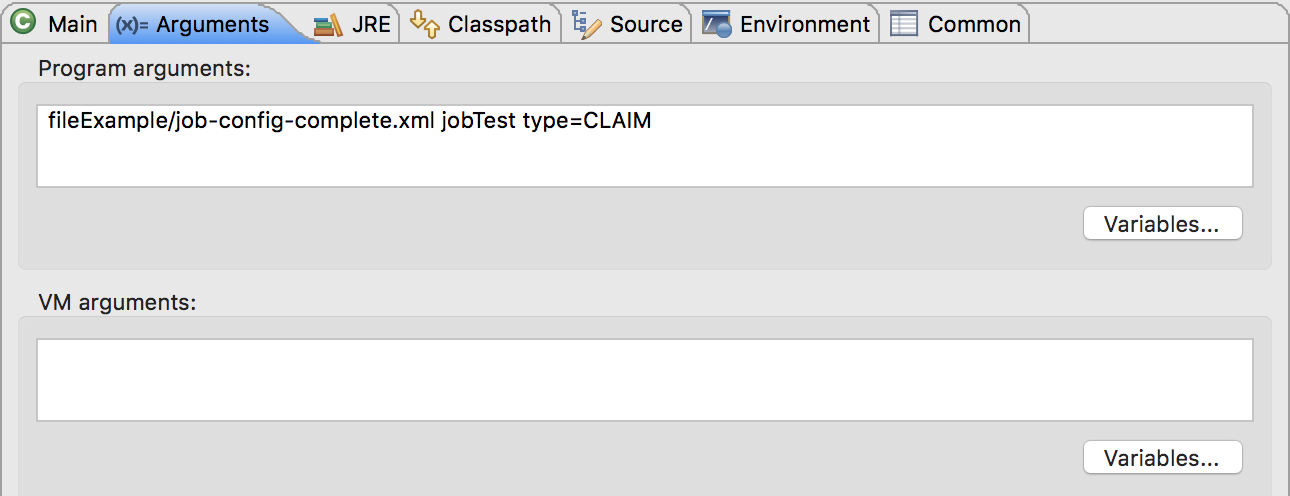
The examples run the application using a class with the main method. But there are other ways to launch the batch, and one of them is by command line using the class CommandLineJobRunner provided by Spring Batch. The pictures below show you how to do this using eclipse.

The arguments receive the config XML and the job name. If you have some other config file you should insert on VM Arguments.
The complete code you will see in my github.
Conclusion
Spring batch is a very important resource to run schedule process. There are mach more resource to use. This post show you just the first step. Now you have a world to explore.
Go deeply!!!